Showing posts with label p2. Show all posts

Thursday, August 4, 2016

Regular Expression Tester

There are quite a lot regular expression tester utilities available for Eclipse. While all of them do a good job my favorite is RegExTester.

This project has not seen any updates for more than 2 years now, so some of you might consider it discontinued, I call it rock stable!

While working on my Oomph tutorials I found it really annoying that this little tool does not come with a p2 update site, so I created one and put it online. Feel free to use it for your own installations.

P2 site:

https://dl.bintray.com/pontesegger/regextester/

Sunday, May 25, 2014

Implementing a custom discovery site

When developing your own components you might end up with some optional features you do not want to install by default. Typically your first option would be to put additional features to an update site so your users can install them on their own.

But sometimes it would be great to use a more polished interface like the discovery mechanism used by maven or subversive. As p2 already provides all the necessary dialogs such a feature can easily be implemented in your own application.

There exist two predefined commands for the discovery wizard. This tutorial will describe both of them.

Source code for this tutorial is available on googlecode as a single zip archive, as a Team Project Set or you can checkout the SVN projects directly.  

Option 1: Display p2 repository content in a wizard

The first option allows to simply display the content of an existing p2 repository in a nicer way. To use it, simply add a new command to a toolbar or menu. Use org.eclipse.equinox.p2.ui.discovery.commands.ShowRepositoryCatalog as commandId and add a parameter to it. Set the parameter name to org.eclipse.equinox.p2.ui.discovery.commands.RepositoryParameter and the value to the URI of the p2 update site to use.

 That's it, nothing else to do. After activating the command you will end up with a dialog like this:

While this solution is extremely simple, it has some drawbacks:
  • only one p2 repository per handler
  • no filtering
  • no extended information (icons, links, ...)

Option 2: Customize dialog with a discovery site

While the first option might be sufficient for small repositories, you might want to have more control over the displayed items when your components get more complex. The second mechanism allows you to exactly define the content of the wizard.

Step 1: Add command

As before we can use a predefined command with using commandId org.eclipse.equinox.p2.ui.discovery.commands.ShowBundleCatalog. Again we need a parameter: set name to org.eclipse.equinox.p2.ui.discovery.commands.DirectoryParameter. For value you need to provide a URL that points to an XML file containing directory information. In the example code we will host this locally. In a real life scenario you would put this on your project website.

Step 2: Populating directory.xml

A directory is a simple list of eclipse plugin files (in jar format) that contain further information.

<?xml version="1.0" encoding="UTF-8"?>
<directory>
 <entry
  url="file:///mnt/data/develop/workspaces/Blog/com.codeandme.discovery/resources/directory.jar"
  permitCategories="true" />
</directory>

Each entry points to an eclipse plugin that contains actual extension listings.

Step 3: Provide extension listings

Create a new Plug-in Project and switch to the Extensions tab of your plugin.xml. Add a new extension of type org.eclipse.mylyn.discovery.core.connectorDiscovery.

The first component to create is a connectorCategory. It will show up as a nice blueish bar in the wizard. The values to provide are pretty much self explanatory. Categories may have icons and an overview. The overview will be denoted as a small info icon on the right hand side of the entry. It will open a popup on mouse hover.

Now we may add dedicated components to a category. Therefore add a new categoryDescriptor to the extension point. Add all the required fields which should be straight forward. Similar to the category description before we may set an icon and overview information. The id provides a feature identifier of the component to be installed. If we want to install multiple features at the same time, we can attach iu (installable units) nodes to the descriptor. By providing such nodes, the original id will not be used anymore, so make sure you add that feature as a iu node, too.

Optional you may add a certification node to the extension point. If present, a categoryDescriptor may link to it, which provides a "certified" link at the end of its description.


Make sure you deploy the plug-in to the correct location as defined in the directory.xml file and give it a try.

Note

When using the example code from svn you have to update directory.xml content to fit your local path. Also update the location of directory.xml in your command parameter.

Thursday, August 2, 2012

Mirroring a p2 repository

For builds or for resolving a target platform eclipse often needs to connect to remote update sites. If you are behind a proxy or on a slow connection this can be annoying. A solution to that could be a local mirror of an update site.

Eclipse provides two applications to do exactly that (executed on a shell):
<eclipse install dir>/eclipse -nosplash -verbose -consoleLog -application org.eclipse.equinox.p2.artifact.repository.mirrorApplication -source <update site> -destination<local folder>
<eclipse install dir>/eclipse -nosplash -verbose -consoleLog -application org.eclipse.equinox.p2.metadata.repository.mirrorApplication -source <update site> -destination<local folder>
The first one mirrors artifacts like, plugins, features, additional libraries and so on. The second one mirrors metadata like bundle dependencies or repository content overview.

You can add proxy settings by providing http.proxyHost / http.proxyPort properties to the command. To mirror the Juno repository to C:\p2\Juno you would use:
<eclipse install dir>/eclipse -Dhttp.proxyHost=proxy.nowhere.com -Dhttp.proxyPort=80 -nosplash -verbose -consoleLog -application org.eclipse.equinox.p2.artifact.repository.mirrorApplication -source http://download.eclipse.org/releases/juno -destination file:/C:/p2/Juno/
<eclipse install dir>/eclipse -Dhttp.proxyHost=proxy.nowhere.com -Dhttp.proxyPort=80 -nosplash -verbose -consoleLog -application org.eclipse.equinox.p2.metadata.repository.mirrorApplication -source http://download.eclipse.org/releases/juno -destination file:/C:/p2/Juno/

For details see the online documentation or the wiki entry.

Wednesday, November 9, 2011

Custom Installation Step

Update:
Last time I tried you could not use custom touchpoint actions that came with the current installation package. It seems eclipse has a but there and does not consider fresh installed actions when it searches for it. So you can only use actions that were installed with a previous installation step.


When you provide a feature via an update site sometimes it would be nice to do extra stuff once the feature is installed. For example we could automatically open a configuration dialog or the welcome screen providing new information.

Before p2 we could use a custom installation handler. Now we need to use touchpoints.

Source code for this tutorial is available on googlecode as a single zip archive, as a Team Project Set or you can checkout the SVN projects directly.

Step 1: Prerequisites

Create a simple Plug-in project called com.example.touchpoint.action. You do not need to provide an Activator or UI components.

Create a Feature project called com.example.custominstall.feature. Add com.example.touchpoint.action to the included Plug-ins.

Step 2: Preparing touchpoint action

There already exist lots of actions which you could use for your own purposes.

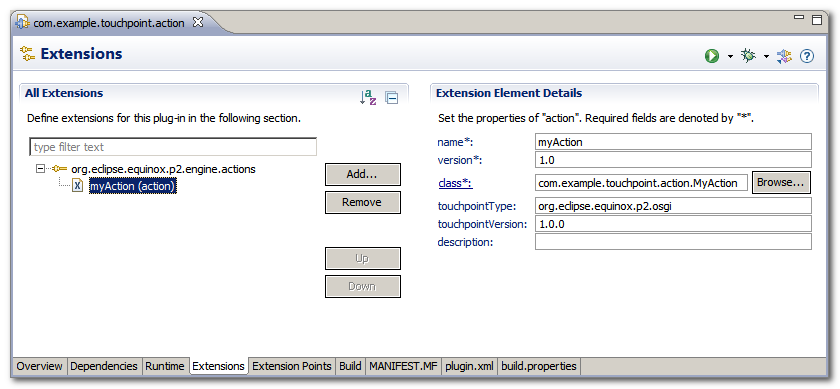
In this example we want to create a new action. Therefore open the plugin.xml from your com.example.touchpoint.action project. Switch to the Extensions tab and add a new action by adding an org.eclipse.equinox.p2.engine.actions extension. Set the touchpointType to org.eclipse.equinox.p2.osgi and find a unique name for your action.


Afterwards create a new class called com.example.touchpoint.action.MyAction.
package com.example.touchpoint.action;

import java.util.Map;

import org.eclipse.core.runtime.IStatus;
import org.eclipse.core.runtime.Status;
import org.eclipse.equinox.p2.engine.spi.ProvisioningAction;
import org.eclipse.jface.dialogs.MessageDialog;
import org.eclipse.swt.widgets.Display;

public class MyAction extends ProvisioningAction {

 @Override
 public IStatus execute(Map<String, Object> parameters) {
  System.out.println("**************************************************** Feature installation");
  for (String key : parameters.keySet())
   System.out.println("Key: " + key + ", value: " + parameters.get(key));

  if (Display.getDefault() != null)
   Display.getDefault().asyncExec(new Runnable() {

    @Override
    public void run() {
     MessageDialog.openInformation(Display.getDefault().getActiveShell(), "Feature installation",
       "Your feature is in the process of being installed.");
    }
   });

  return Status.OK_STATUS;
 }

 @Override
 public IStatus undo(Map<String, Object> parameters) {
  return Status.OK_STATUS;
 }
}
Now we need to register our custom action with p2. Therefore create a new file /META_INF/p2.inf with following content:
provides.0.namespace=org.eclipse.equinox.p2.osgi
provides.0.name=myAction
provides.0.version=1.0
Line 2 contains the name parameter of our action definition. The "0" in the key is an index which needs to be incremented if you define multiple actions within the same p2.inf file.

Make sure your p2.inf file is included in your build!


Step 3: Activating install action

We want our action to be called right when our feature is installed. So  switch to the com.example.custominstall.feature and create a new file /p2.inf.
metaRequirements.0.namespace=org.eclipse.equinox.p2.osgi
metaRequirements.0.name=myAction
metaRequirements.0.range=1.0

instructions.configure=myAction(key1:value1,key2:value2);
instructions.configure.import=com.example.plugin.myAction
This will call our custom action when our feature is configured. You can find a list of available phases at the end of this wiki entry.

The import and the action need to use the same phase identifier, otherwise the action will not be found.
As you can see from the action implementation the parameters will be stored in a Map<String,String>.

Again make sure to add the p2.inf to the build.

Step 4: Try it out

To give it a try we need to create a p2 repository from which we can install. We can do this quickly by using a special export wizard. Open File / Export... and start the Plug-in Development / Deployable features wizard. Select the feature you want to export and provide a destination directory where the p2 update site should be created.

Afterwards try to install the feature from that directory.

Additional Notes

When your action uses GUI code make sure that a GUI is available. Remember that the action might be run by a headless install.

Once an action is installed, it can be used by other features too. So Action provider and the feature using the action do not necessarily need to be the same.

Tuesday, September 20, 2011

Buckminster qualifier replacement

Information:
Buckminster does not seem to be very active anymore. To build Eclipse products, update sites and similar have a look at my tycho tutorials. My Buckminster tutorials are no longer maintained and remein here as reference only.


When your Plug-ins and features use a .qualifier in the version string, Buckminster can replace that with dedicated data. The data to be used can be modified in the .properties file passed to buckminster actions.

To use version information:
qualifier.replacement.*=generator:lastRevision
generator.lastRevision.format=r{0,number,00000}
... will use last revision. Eg creates: com.example.myplugin_1.0.0.r1234 for revision 1234.

To use build date:
qualifier.replacement.*=generator:buildTimestamp
generator.buildTimestamp.format='I'yyyyMMdd'-'HHmm
... uses a timestamp with some constant text ('I', '-'). Eg creates com.example.myplugin_1.0.0.I20110920-1408

Buckminster RCP build with independent features

Information:
Buckminster does not seem to be very active anymore. To build Eclipse products, update sites and similar have a look at my tycho tutorials. My Buckminster tutorials are no longer maintained and remein here as reference only.


When building an RCP application all features are typically part of the product. For example the product we built in my previous post contains the Eclipse Platform and a custom feature.


Now when it comes to updates P2 only regards its root nodes. So when you want to update your custom feature only you will soon run into problems. Andrew Niefer wrote a nice blog entry on this topic.

What we want to do is to install a core product only and afterwards install independent features that are not referenced from the base product. This way all these features can be updated independently.

Concept

We first will create a P2 update site containing everything our final installation might need. The product, RCP stuff like platform launchers and optional features. Afterwards we will use this update site to assemble independent features to our final RCP application.

Our final setup will include 6 Plug-ins/Features, 2 Plug-ins containing code, 2 Features each containing one of the Plug-ins and 2 assembly projects. You can see their dependencies on the diagram below:


 We will start by using the code from our previous examples for publishing an update site and for an RCP build as a basis.

Step 1: Updating the update site

The update site shall include code needed for the RCP Feature, so we need to add it to the Included Features. Open com.example.update.p2/features.xml and add com.example.rcp.feature to the list of Included Features.

This will trigger a build for the RCP core feature when the update site is built.

Step 2: Adapting target platform

If you only build for your development platform you can skip this step.

We need to add the Delta Pack to our target platform we defined for the RCP build. Download the delta pack from Eclipse. Go to http://download.eclipse.org/eclipse/downloads/, switch to the 3.x downloads. Afterwards select your release from Latest Releases, find and download the Delta Pack. This package contains platform specific executables so we can build eg a linux RCP on windows.
 Go to Window -> Preferences -> Plug-in Development -> Target Platform. Edit your custom Target Definition and add the location of the eclipse folder located inside the downloaded zip.

You can find a more detailed example on the Target Platform by Ralf Ebert.

Step 3: RCP Build Project

Our com.example.rcp.releng project needs some updates. First we update the ant file build/createProduct.ant.
<project>
     <pathconvert property="equinox.launcher.jar">
       <first count="1">
         <sort>
           <fileset dir="${eclipse.home}/plugins" includes="**/org.eclipse.equinox.launcher_*.jar"/>
           <reverse xmlns="antlib:org.apache.tools.ant.types.resources.comparators">
             <date/>
           </reverse>
         </sort>
       </first>
     </pathconvert>
    
    <target name="create.product">
        <property name="installableIUs" value="${iu},${features}" />        
        <property name="destination" location="${sp:destination}"/>
        <delete dir="${destination}"/>
        <mkdir dir="${destination}"/>
        <makeurl property="repository" file="${sp:updateSite}"/>
        <echoproperties/>
        <echo message="============================== RCP Settings =============================="/>
        <echo message="Repository:  ${repository}"/>
        <echo message="Destination: ${destination}"/>
        <echo message="Product:     ${iu}"/>
        <echo message="Features:    ${features}"/>
        <echo message="IUs:         ${installableIUs}"/>
        <echo message="target:      ${target.os}.${target.ws}.${target.arch}"/>
        <echo message="============================== Building RCP =============================="/>
        <java jar="${equinox.launcher.jar}" fork="true" failonerror="true" >
            <arg value="-application"/>
            <arg value="org.eclipse.equinox.p2.director"/>
            <arg value="-repository"/>
            <arg value="${repository}"/>
            <arg value="-destination"/>
            <arg value="${destination}"/>
            <arg value="-profile"/>
            <arg value="${product.profile}"/>
            <arg value="-profileProperties" />
            <arg value="org.eclipse.update.install.features=true" />
            <arg value="-installIU"/>
            <arg value="${installableIUs}"/>
            <arg value="-p2.os" />
            <arg value="${target.os}" />
            <arg value="-p2.ws" />
            <arg value="${target.ws}" />
            <arg value="-p2.arch" />
            <arg value="${target.arch}" />
            <arg value="-consoleLog"/>
            <arg value="-roaming"/>
        </java>
    </target>
</project>
The director used for the build process now gets a list of installable units (IUs). This list includes our product followed by all independent features we wish to install.

Now change buckminster.cspex to
<?xml version="1.0" encoding="UTF-8"?>
<cspecExtension xmlns:com="http://www.eclipse.org/buckminster/Common-1.0"
    xmlns="http://www.eclipse.org/buckminster/CSpec-1.0">

    <dependencies>
        <dependency name="com.example.update.p2" componentType="eclipse.feature" />
    </dependencies>
    <actions>
        <public name="create.product" actor="ant">
            <actorProperties>
                <property key="buildFile" value="build/createProduct.ant" />
                <property key="targets" value="create.product" />
            </actorProperties>
            <properties>
                <property key="profile" value="${product.profile}" />
                <property key="iu" value="${product.id}" />
                <property key="features" value="${product.features}" />
            </properties>
            <prerequisites alias="updateSite">
                <attribute name="site.p2.publish" component="com.example.update.p2" />
            </prerequisites>
            <products alias="destination" base="${product.destination}">
                <path path="${product.name}.${target.ws}.${target.os}.${target.arch}/" />
            </products>
        </public>

        <public name="create.product.zip" actor="ant">
            <actorProperties>
                <property key="buildFileId" value="buckminster.pdetasks" />
                <property key="targets" value="create.zip" />
            </actorProperties>
            <prerequisites alias="action.requirements">
                <attribute name="create.product" />
            </prerequisites>
            <products alias="action.output" base="${product.destination}">
                <path path="${product.name}.${target.ws}.${target.os}.${target.arch}.zip" />
            </products>
        </public>
    </actions>
</cspecExtension>
This will give us 2 new actions: 
  • create.product to build our RCP applicaton
  • create.product.zip which will build and zip our application.

Finally change buckminster_product.properties to
# Where all the output should go
buckminster.output.root=C:/Build/BuildArtifacts

# Where the temp files should go
buckminster.temp.root=${user.home}/tmp

# How .qualifier in versions should be replaced
qualifier.replacement.*=generator:lastRevision

# update site settings
updatesite.destination=C:/Build/UpdateSite

# rcp settings
product.id=com.example.rcp.core.myproduct
product.name=MyProduct

# leave empty when no features are needed, but do NOT comment this out
# multiple features can be defined as a comma separated list
product.features=com.example.myfeature.feature.group
product.profile=ExampleProfile

product.destination=C:/Build/Sample RCP

target.os=win32
target.ws=win32
target.arch=x86
This property file is used for building the update site and the product. Therefore we need some update site properties too.
  • product.name
    will be used for the product build folder and the zip file. It will not be used anywhere else.
  • product.features
    a comma separated list of all features that should be installed independently from the base product. So if your base product already includes FeatureA, do not add it here! The property may be left empty. In this case you will get the same results as from Buckminster RPC build.
     
  • product.profile
    name of the P2 profile to be created. This will be part of your final RPC application
  • target.X
    Needs to be set to a defined target platform. We cannot use * here anymore as we need to build an RCP dedicated to a specific platform.

    Building for a dedicated platform also influences the content of our update site. All Plug-ins/Features built using this properties file will be built for the defined target only. This might be of interest when you use code that is platform dependent. You still can build your update site only to keep it platform independent.

Step 4: Build the product

When you are done right click on your com.example.rcp.releng project and select Buckminster -> Invoke Action... 

Select create.product and enter the path to your buckminster_product.properties file. After hitting OK you can find your RCP product in C:\Build\Sample RCP.

Our product consists of the consists of the core product My RCP Example which includes the Platform and a custom made Feature My Base Features. Additionally it contains another feature Myfeature that is independent of the core product. Hence we can update Myfeature without updating My RCP Example.


Monday, September 12, 2011

Publishing a Buckminster Update Site

Information:
Buckminster does not seem to be very active anymore. To build Eclipse products, update sites and similar have a look at my tycho tutorials. My Buckminster tutorials are no longer maintained and remein here as reference only.


Building a p2 update site with Buckminster is fairly easy. Following the tutorial "Building a p2 Update Site" from BuckyBook will give you a working update site in minutes. What I was missing was some way to publish the resulting p2 site automatically. Fortunately Buckminster actions can easily be extended. What we want to do is create a new ant task that copies over the p2 site to a user defined location.

Source code for this tutorial is available on googlecode as a single zip archive, as a Team Project Set or you can checkout the SVN projects directly.

Step 1: Prerequisites

Before we can extend our build process we need to create an update site according to the Buckminster tutorial.

Plug-in Project

Create a new Plug-in Project named com.example.myplugin. On the 2nd page enable This plug-in will make contributions to the UI. On the 3rd page select the template Plug-in with a view. Leave everything else unchanged.

Feature Project

Create a new Feature Project named com.example.myfeature. Add the plug-in com.example.myplugin to the feature.

Update Site Feature

Buckminster needs a unique Feature Project for building its update site. So create a new Feature Project named com.example.update.p2. Add com.example.myfeature to the included features.

Create a new file called buckminster_p2.properties with following content:
# Where all the output should go
buckminster.output.root=${user.home}/Build/Example P2

# Where the temp files should go
buckminster.temp.root=${user.home}/tmp

# How .qualifier in versions should be replaced
qualifier.replacement.*=generator:lastRevision

target.os=*
target.ws=*
target.arch=*

Creating categories

A nice update site groups its features in categories. So lets create a new Category Definition in com.example.update.p2. The editor is rather straight forward. Create categories with a unique ID and a display Name. Afterwards add your com.example.myfeature feature to the category.


Whenever your feature version number changes, you need to re-add your feature again.
Now right click on your com.example.update.p2 Feature Project and select Buckminster -> Invoke Action...


Select the site.p2 action and enter your buckminster_p2.properties properties file location. After hitting OK your update site will be built. Following this example it will be located at

${user.home}/Example P2/com.example.update.p2_1.0.0-eclipse.feature/site.p2

Step 2: Generating a publish action

To create a publish action we need to create an ant file doing the work and a specification telling buckminster what to do. Lets start by declaring the destination for the publish action.

Open buckminster_p2.properties and add following line

updatesite.destination=${user.home}/Build/UpdateSite


This will be our target destination. Now create a new file buckminster.cspex in your com.example.update.p2 Feature Project with following content:

<?xml version="1.0" encoding="UTF-8"?>
<cspecExtension xmlns:com="http://www.eclipse.org/buckminster/Common-1.0"
                    xmlns="http://www.eclipse.org/buckminster/CSpec-1.0">
    <actions>
        <public name="site.p2.publish" actor="ant">
            <actorProperties>
                <property key="buildFile" value="build/publishUpdateSite.ant" />
                <property key="targets" value="publish.p2" />
            </actorProperties>
            <properties>
                <property key="source" value="${buckminster.output}/site.p2/" />
                <property key="destination" value="${updatesite.destination}" />
            </properties>
            <prerequisites alias="repository">
                <attribute name="site.p2" />
            </prerequisites>
            <products base="${updatesite.destination}" upToDatePolicy="ACTOR"/>
        </public>
    </actions>
</cspecExtension>
Line 5 creates an action called site.p2.publish and delares it an ant task.
Line 7 defines the and build file, line 8 the ant target
Line 11,12 define source and destination properties for the ant task
Line 15 defines the buckminster site.p2 action as a prerequisite. This means that first site.p2 is executed, afterwards our ant task is called.

Finally we need to add our ant task. Create a file build/publishUpdateSite.ant and add following lines:

<project>
    <target name="publish.p2">
        <echo message="Source:      ${source}"/>
        <echo message="Destination: ${destination}"/>
        
        <mkdir dir="${destination}"/>
        <copy todir="${destination}" preservelastmodified="true">
            <fileset dir="${source}"/>
        </copy>
    </target>
</project>
This will create the destination folder if not present and copy the p2 site content to that location.

Step 3: Executing the publish action

Save all files, right click on your com.example.update.p2 Feature Project and select Buckminster -> Invoke Action...
Use site.p2.publish action. Take care that the property file location is still correct. Push OK to publish your update site. You can find your site at C:\Build\UpdateSite

The ant task is rather simple and can easily be extended to eg. use WebDav to upload the content to a webserver or to store the update site to SVN, ...

Alternative: Alter site.p2 action directly

If publishing is just a question of copying files we can do this without our custom action and ant task. Instead we can directly modify the target path of the site.p2 action. Therefore set your buckminster.cspex content to

<?xml version="1.0" encoding="UTF-8"?>
<cspecExtension xmlns:com="http://www.eclipse.org/buckminster/Common-1.0"
                    xmlns="http://www.eclipse.org/buckminster/CSpec-1.0">

    <alterActions>
        <public name="site.p2">
            <products base="${updatesite.destination}/" upToDatePolicy="ACTOR"/>
        </public>
    </alterActions> 
</cspecExtension>