Wednesday, November 16, 2011

Welcome Page

Today we will have a look at the welcome screen. We will start by following A short tutorial on Intro/Welcome. Then we will add a custom entry to the news section. Finally we are going to implement code to trigger the welcome screen a second time.

Source code for this tutorial is available on googlecode as a single zip archive, as a Team Project Set or you can checkout the SVN projects directly.

Step 1: Creating a basic product

Create a new Plug-in project called com.codeandme.welcome. We do not need an Activator nor contributions to the UI.

An Intro needs a product, so we need to create one. Therefore create a new Product Configuration with basic settings. Name your product file Example.product.


In the Product Definition click on New... and set the Product ID to example. Select the Application org.eclipse.ui.ide.workbench. This will start the default workbench. For a real life implementation you would of course use your own application here.


Back at the product definition save and click Launch an Eclipse Application. This will create a new launch configuration and furthermore synchronize the product definition with the plugin.xml. Changes of the product definition will not automatically be synchronized so remember to hit either Synchronize or Launch an Eclipse Application on any change.

Step 2: Defining the Intro


Switch to the Extensions tab of your plugin.xml. Add a new extension for org.eclipse.ui.intro. Add a new introProductBinding to it. Enter your productId com.codeandme.welcome.product and the introId of the universal intro org.eclipse.ui.intro.universal.

Make sure your plugin dependencies include org.eclipse.ui.intro and org.eclipse.ui.intro.universal.


Now add some branding to the intro by adding properties to the product definition. Add a property introBrandingImage for the logo in the upper left corner. Set product:<path/to/image.png> as property value and put the image into the com.example.welcome Plug-in. Add another property introTitle containing the main heading of your welcome page.

Your final plugin.xml should look like this:
<?xml version="1.0" encoding="UTF-8"?>
<?eclipse version="3.4"?>
<plugin>
   <extension
         point="org.eclipse.ui.intro">
      <introProductBinding
            introId="org.eclipse.ui.intro.universal"
            productId="com.example.welcome.product">
      </introProductBinding>
   </extension>
   <extension
         id="product"
         point="org.eclipse.core.runtime.products">
      <product
            application="org.eclipse.ui.ide.workbench"
            name="example">
         <property
               name="introBrandingImage"
               value="product:images/logo.png">
         </property>
         <property
               name="introTitle"
               value="My Example RCP Application">
         </property>
      </product>
   </extension>
</plugin>

Finally we need to add a theme for our intro. Therefore create a file plugin_customization.ini in the root directory of your Plug-in with following content:
org.eclipse.ui.intro/INTRO_THEME = org.eclipse.ui.intro.universal.slate
org.eclipse.ui.intro.universal/INTRO_ROOT_PAGES = overview,tutorials,samples,whatsnew,webresources
Line 2 lists all the root pages that should be available. Adapt this list to your own needs.

Save and launch your product to see the welcome page in its full beauty. If you do not see the welcome screen you might have forgotten to clear your workspace. You can activate this setting in your launch configuration on the Main tab.

Step 3: Adding content to the Whats New section

Open the Extensions tab of your plugin.xml. Now add an extension for org.eclipse.ui.intro.configExtension and use the template Universal Welcome Contribution.


The wizard lets you select where to place content and creates sample files automatically.


By editing /intro/sample.xml you can easily adapt the example to your needs.

Reactivating welcome screen

Eclipse will automatically deactivate the welcome screen once it was presented to the user. Sometimes you might want to reactivate the screen for the next workbench startup. You can do this with this line of code.

PlatformUI.getPreferenceStore().setValue(IWorkbenchPreferenceConstants.SHOW_INTRO, true);

You might want to use this to display news after an update. Therefore you can combine this with a Custom Installation Step.

Wednesday, November 9, 2011

Custom Installation Step

Update:
Last time I tried you could not use custom touchpoint actions that came with the current installation package. It seems eclipse has a but there and does not consider fresh installed actions when it searches for it. So you can only use actions that were installed with a previous installation step.


When you provide a feature via an update site sometimes it would be nice to do extra stuff once the feature is installed. For example we could automatically open a configuration dialog or the welcome screen providing new information.

Before p2 we could use a custom installation handler. Now we need to use touchpoints.

Source code for this tutorial is available on googlecode as a single zip archive, as a Team Project Set or you can checkout the SVN projects directly.

Step 1: Prerequisites

Create a simple Plug-in project called com.example.touchpoint.action. You do not need to provide an Activator or UI components.

Create a Feature project called com.example.custominstall.feature. Add com.example.touchpoint.action to the included Plug-ins.

Step 2: Preparing touchpoint action

There already exist lots of actions which you could use for your own purposes.

In this example we want to create a new action. Therefore open the plugin.xml from your com.example.touchpoint.action project. Switch to the Extensions tab and add a new action by adding an org.eclipse.equinox.p2.engine.actions extension. Set the touchpointType to org.eclipse.equinox.p2.osgi and find a unique name for your action.


Afterwards create a new class called com.example.touchpoint.action.MyAction.
package com.example.touchpoint.action;

import java.util.Map;

import org.eclipse.core.runtime.IStatus;
import org.eclipse.core.runtime.Status;
import org.eclipse.equinox.p2.engine.spi.ProvisioningAction;
import org.eclipse.jface.dialogs.MessageDialog;
import org.eclipse.swt.widgets.Display;

public class MyAction extends ProvisioningAction {

 @Override
 public IStatus execute(Map<String, Object> parameters) {
  System.out.println("**************************************************** Feature installation");
  for (String key : parameters.keySet())
   System.out.println("Key: " + key + ", value: " + parameters.get(key));

  if (Display.getDefault() != null)
   Display.getDefault().asyncExec(new Runnable() {

    @Override
    public void run() {
     MessageDialog.openInformation(Display.getDefault().getActiveShell(), "Feature installation",
       "Your feature is in the process of being installed.");
    }
   });

  return Status.OK_STATUS;
 }

 @Override
 public IStatus undo(Map<String, Object> parameters) {
  return Status.OK_STATUS;
 }
}
Now we need to register our custom action with p2. Therefore create a new file /META_INF/p2.inf with following content:
provides.0.namespace=org.eclipse.equinox.p2.osgi
provides.0.name=myAction
provides.0.version=1.0
Line 2 contains the name parameter of our action definition. The "0" in the key is an index which needs to be incremented if you define multiple actions within the same p2.inf file.

Make sure your p2.inf file is included in your build!


Step 3: Activating install action

We want our action to be called right when our feature is installed. So  switch to the com.example.custominstall.feature and create a new file /p2.inf.
metaRequirements.0.namespace=org.eclipse.equinox.p2.osgi
metaRequirements.0.name=myAction
metaRequirements.0.range=1.0

instructions.configure=myAction(key1:value1,key2:value2);
instructions.configure.import=com.example.plugin.myAction
This will call our custom action when our feature is configured. You can find a list of available phases at the end of this wiki entry.

The import and the action need to use the same phase identifier, otherwise the action will not be found.
As you can see from the action implementation the parameters will be stored in a Map<String,String>.

Again make sure to add the p2.inf to the build.

Step 4: Try it out

To give it a try we need to create a p2 repository from which we can install. We can do this quickly by using a special export wizard. Open File / Export... and start the Plug-in Development / Deployable features wizard. Select the feature you want to export and provide a destination directory where the p2 update site should be created.

Afterwards try to install the feature from that directory.

Additional Notes

When your action uses GUI code make sure that a GUI is available. Remember that the action might be run by a headless install.

Once an action is installed, it can be used by other features too. So Action provider and the feature using the action do not necessarily need to be the same.

Friday, October 28, 2011

Form editor with XML source view

Form based editors seem to be everywhere nowadays. They provide a great way for the user to operate on complex file types like xml files. Building a forms based editor similar to the PDE Plug-in Editor is quite easy.

Source code for this tutorial is available on github as a single zip archive, as a Team Project Set or you can browse the files online.


Step 1: Defining the editor

Create a new Plug-in Project called com.codeandme.multiparteditor.

I already showed how to reuse the XML source editor, so I will keep the editor definition part rather short: Define an editor and a content type in your plugin.xml. It should look like this afterwards:
<?xml version="1.0" encoding="UTF-8"?>
<?eclipse version="3.4"?>
<plugin>
   <extension
         point="org.eclipse.ui.editors">
      <editor
            class="com.codeandme.multiparteditor.SampleEditor"
            default="false"
            id="com.codeandme.editor.sampleEditor"
            name="Sample Editor">
         <contentTypeBinding
               contentTypeId="com.codeandme.contenttype.sample">
         </contentTypeBinding>
      </editor>
   </extension>
   <extension
         point="org.eclipse.core.contenttype.contentTypes">
      <content-type
            base-type="org.eclipse.core.runtime.xml"
            file-extensions="sample"
            id="com.codeandme.contenttype.sample"
            name="Sample File"
            priority="normal">
      </content-type>
   </extension>

</plugin>
Switch to the Dependencies tab and add following dependencies:
  • org.eclipse.core.resources
  • org.eclipse.core.runtime
  • org.eclipse.text
  • org.eclipse.ui
  • org.eclipse.ui.editors
  • org.eclipse.ui.forms
  • org.eclipse.ui.ide
  • org.eclipse.wst.sse.ui
  • org.eclipse.wst.xml.core

Step 2: Implementing the editor

Create a new Class com.codeandme.multiparteditor.SampleEditor
package com.codeandme.multiparteditor;

import org.eclipse.core.runtime.IProgressMonitor;
import org.eclipse.ui.IEditorInput;
import org.eclipse.ui.IEditorSite;
import org.eclipse.ui.PartInitException;
import org.eclipse.ui.forms.editor.FormEditor;
import org.eclipse.wst.sse.ui.StructuredTextEditor;

public class SampleEditor extends FormEditor {

 private StructuredTextEditor fSourceEditor;
 private int fSourceEditorIndex;

 @Override
 public void init(final IEditorSite site, final IEditorInput input) throws PartInitException {
  super.init(site, input);

  // TODO: load your model here
 }

 @Override
 protected void addPages() {
  fSourceEditor = new StructuredTextEditor();
  fSourceEditor.setEditorPart(this);

  try {
   // add form pages
   addPage(new FirstForm(this, "firstID", "First Page"));

   // add source page
   fSourceEditorIndex = addPage(fSourceEditor, getEditorInput());
   setPageText(fSourceEditorIndex, "Source");
  } catch (final PartInitException e) {
   // TODO Auto-generated catch block
   e.printStackTrace();
  }
 }

 @Override
 public void doSaveAs() {
  // not allowed
 }

 @Override
 public boolean isSaveAsAllowed() {
  return false;
 }

 @Override
 public void doSave(IProgressMonitor monitor) {
  throw new RuntimeException("To be implemented");
 }
}
That's all you need for your very first FormEditor.

Step 3: Add form pages

Create additional FormPages and add them to your editor. This is best done using WindowBuilder by using the New Wizard: WindowBuilder/SWT Designer/Forms/FormPage.

There are lots of tutorials out there, see here, here, or here to get you going.

Step 4: Keeping your model consistent

As we have multiple parts within our editor that modify the same source, we need some synchronization mechanism. The source editor already operates on a Document and updates its content accordingly. So our FormPages could operate on the same Document but this would result in lots of XML parsing. There are great tools for this out there, however in this example we will use another approach:

The main editor will maintain a model and inform and update an EditorPart before it is activated. That model can import and export its state to XML, which we will use to synchronize model and source editor.

All form pages should modify the model directly. When the editor page is changed, the activated page will be notified to update itself regarding new model data.

Open the SampleEditor and add following code at the end of the addPages() method:
        // add listener for changes of the document source
        getDocument().addDocumentListener(new IDocumentListener() {

            @Override
            public void documentAboutToBeChanged(final DocumentEvent event) {
                // nothing to do
            }

            @Override
            public void documentChanged(final DocumentEvent event) {
                fSourceDirty = true;
            }
        });
The listener will be notified whenever the source editor is editing the document. We use an internal flag to indicate that our form pages need an update.

Additionally add/exchange following methods:
     /** Keeps track of dirty code from source editor. */
    private boolean fSourceDirty = false;

    @Override
    public void doSave(final IProgressMonitor monitor) {
        if (getActivePage() != fSourceEditorIndex)
            updateSourceFromModel();

        fSourceEditor.doSave(monitor);
    }

    @Override
    protected void pageChange(final int newPageIndex) {
        // check for update from the source code
        if ((getActivePage() == fSourceEditorIndex) && (fSourceDirty))
            updateModelFromSource();

        // check for updates to be propagated to the source code
        if (newPageIndex == fSourceEditorIndex)
            updateSourceFromModel();

        // switch page
        super.pageChange(newPageIndex);

        // update page if needed
        final IFormPage page = getActivePageInstance();
        if (page != null) {
            // TODO update form page with new model data
            page.setFocus();
        }
    }

    private void updateModelFromSource() {
        // TODO update source code for source viewer using new model data
        fSourceDirty = false;
    }

    private void updateSourceFromModel() {
        // TODO update source page from model
        // getDocument().set("new source code");
        fSourceDirty = false;
    }

    private IDocument getDocument() {
        final IDocumentProvider provider = fSourceEditor.getDocumentProvider();
        return provider.getDocument(getEditorInput());
    }

    private IFile getFile() {
        final IEditorInput input = getEditorInput();
        if (input instanceof FileEditorInput)
            return ((FileEditorInput) input).getFile();

        return null;
    }

    private String getContent() {
        return getDocument().get();
    }


doSave() on line 5 uses the source page save routine. Therefore we need to make sure, the source code is up to date.

pageChange() on line 13 first checks if we need to either update the model from the source code or the source code from the model. This happens whenever we switch from/to the source view. After the page is switched we check whether the new page is a form page. If so, we need to update the form page (see line 28). This could be done by calling page.setFocus(); and overwrite setFocus() in the FormPage implementation.

Methods getDocument(), getFile(), getContent() are there for your convenience. You can delete the latter two if you don't need them.

Monday, October 24, 2011

Reusing XML source editor

The Web Tools Platform Project from Eclipse features a nice XML editor which you can find at various places within the IDE. It is generally used to edit xml files, but you can also find it in the Plug-in Editor when editing the source of plugin.xml directly.

When you have your own config files that store xml content you can extend the default editor and bind it to your content. Basically you may achieve the same result by simply creating a new File Association (Preferences/General/Content Types) for your file type, but as we want to extend the editor in a later tutorial, we will provide an editor extension.

Source code for this tutorial is available on github as a single zip archive, as a Team Project Set or you can browse the files online.

Step 1: Defining content type

Create a new Plug-in project called com.codeandme.editor. Do not add an Activator or UI elements. Go to the Extensions tab of your plugin.xml and add a new extension for org.eclipse.core.contenttype.contentTypes. Right click and select New -> content-type.

Name your content type and select a unique id (we need that afterwards). Make sure the base-type is set to org.eclipse.core.runtime.xml and don't forget to add some file-extensions to bind that type to specific files.
 
Step 2: Creating the editor

Extend org.eclipse.ui.editors and create a new editor. Your editor needs a unique id and some nice name. Before we are going to implement the editor, we add a contentTypeBinding to it. Select the contentTypeId you entered before when we defined the content type.

Now go back to the editor definition and add a class com.codeandme.xmleditor.ExampleEditor with following source:
package com.example.editor;

import org.eclipse.wst.sse.ui.StructuredTextEditor;

public class ExampleEditor extends StructuredTextEditor {

    public ExampleEditor() {
    }
}

Once done your plugin.xml should have following content:
<?xml version="1.0" encoding="UTF-8"?>
<?eclipse version="3.4"?>
<plugin>
   <extension
         point="org.eclipse.core.contenttype.contentTypes">
      <content-type
            base-type="org.eclipse.core.runtime.xml"
            file-extensions="example"
            id="com.codeandme.xmleditor.content.example"
            name="Example Files"
            priority="normal">
      </content-type>
   </extension>
   <extension
         point="org.eclipse.ui.editors">
      <editor
            class="com.codeandme.xmleditor.ExampleEditor"
            id="com.codeandme.xmleditor.example"
            name="Example editor">
         <contentTypeBinding
               contentTypeId="com.codeandme.xmleditor.content.example">
         </contentTypeBinding>
      </editor>
   </extension>
</plugin>

It's easy as that. Now you have a basic XML source editor associated with your example files.

Step 3: Using the editor

When using the editor in your own RCP make sure you include the Plug-ins org.eclipse.wst.xml.core and org.eclipse.wst.xml.ui to your RCP.

Tuesday, October 11, 2011

Remember subversion password

With the Indigo release I switched the subversion provider from Subclipse to Subversive as the latter is the native provider from the eclipse foundation. But it didn't work out for the two of us. Subversive never stored my SVN passwords and ignored the Remember password checkbox. This was quite an annoyance, so I switched back to subclipse. Back there the troubles remained until I switched the svn connector from JavaHL to SVNKit.

Step 1: Install Subclipse with SVNKit

Make sure to enable SVNKit components when installing Subclipse.


Step 2: Activate SVNKit

Open the preferences and go to Team/SVN. On the SVN interface section set the Client to SVNKit (Pure Java).

Monday, September 26, 2011

Hiding UI elements in RCP

External plug-ins and features give you a tremendous power to enrich your RCP applications. Somtimes you might wish to use an external feature without getting all the visual stuff like menus or toolbar items. Hiding them is quite a tricky task. There exist several ways to do this, none of them seems either well documented nor sophisticated.

You can find some documentation on the web like a post from Miles Billsman or a tutorial by Lars Vogel. I am going to sum up things here.

Source code for this tutorial is available on github as a single zip archive, as a Team Project Set or you can browse the files online.

Preparations: A default eclipse IDE RCP

Start by creating a new Plug-in project. This will be no RCP application, nor will it contribute to UI. Just a plain Plug-in. On the overview tab hit Launch an Eclipse application. This will bring up a new Eclipse instance including your Plug-in. Nothing special so far. Now lets start hiding UI elements.

Approach 1: Activities

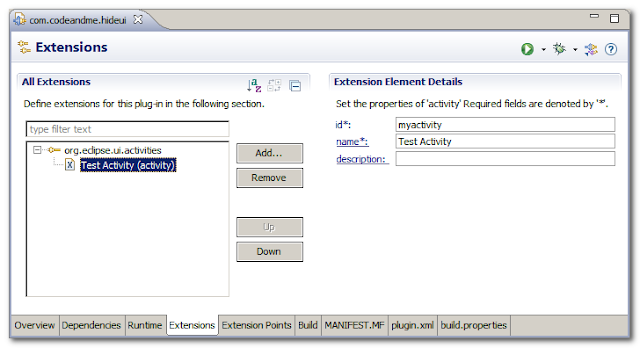
Activities allow to hide UI elements once you know their ID - or at least parts of it. Go to the Extensions tab of your plugin.xml and add a new extension for org.eclipse.ui.activities. Within that extension create a new activity and provide some unique id.


Create a new activityPatternBinding under activities. Refer to your activity ID.
Now for the tricky part: we need to find the ID of an element we want to hide. Then we can pass this ID to pattern to hide the element.

Finding IDs is greatly described in Miles Billsman post, so I will focus on some examples.

Hiding the Run External Tools Toolbar Item

The Plug-in Menu Spy is a great tool to find out more about menu/toolbar entries. Read more about the Plug-in Spy in Lars Vogels tutorial. So hit Alt-Shift-F2 in your running application and click on the toolbar button you want to examine.


The active action definition identifier is what we are looking for. Copy that ID and paste it to your activityPatternBinding pattern. Pattern could be a regular expression and therefore capture a whole bunch of UI elements at once. We want exact matching, so set isEqualityPattern to true.


Start your application and the toolbar button is gone.

Hiding the Next Annotation Toolbar Item

Unfortunately not all UI elements can be hidden by that ID. For example this does not work for the Next Annotation toolbar item. To hide this element we need to track down its definition within the defining Plug-in.

Therefore open 2 views: Plug-in Registry and Plug-ins. By hovering over the toolbar item we can see a text containing "Next Annotation". Lets use these words in Plug-in Registry to filter for that element.


We can see that this element is provided by the org.eclipse.ui.editors Plug-in. Switch to the Plug-ins view, locate org.eclipse.ui.editors and double click to open its plugin.xml. On the Extensions tab we need to look for the contribution definition. It should be either under org.eclipse.ui.commands or under org.eclipse.ui.actionSets. Once located it is easy to find the needed contribution ID for our activityPatternBinding pattern.


As this element is provided by an action we need to prepend the pattern with the defining Plug-in ID. So the full pattern to apply is:

org.eclipse.ui.editors/org.eclipse.ui.edit.text.gotoNextAnnotation

Approach 2: Perspective Extensions

Some elements simply cannot be hidden with activities. Try the pattern ".*" which should hide all elements. Some of them still remain. With perspective extensions we will hide the Run menu and the Run Eclipse Application toolbar item.

Create a new org.eclipse.ui.perspectiveExtensions extension. Under targetID provide the perspective ID for which the element should be hidden. You can use "*" to match all perspectives. Create a new hiddenMenuItem and add use the ID of the run menu org.eclipse.ui.run. This hides the Run menu completely.

To hide the toolbar entry for Run Eclipse Application use a hiddenToolBarItem and an ID of org.eclipse.debug.internal.ui.actions.RunDropDownAction.


The IDs were found using the Plug-in Registry and by parsing plugin.xml files.

Additional Notes

Generally you should have some idea where to look for a contribution definition. This is the most tricky part and there seems to be no easy way for that.

Keep in mind that we just hid those items. They are still available by using keyboard shortcuts or might be accessed indirectly (eg. the Plug-in Manifest Editor still can Launch an Eclipse application).

Tuesday, September 20, 2011

Buckminster qualifier replacement

Information:
Buckminster does not seem to be very active anymore. To build Eclipse products, update sites and similar have a look at my tycho tutorials. My Buckminster tutorials are no longer maintained and remein here as reference only.


When your Plug-ins and features use a .qualifier in the version string, Buckminster can replace that with dedicated data. The data to be used can be modified in the .properties file passed to buckminster actions.

To use version information:
qualifier.replacement.*=generator:lastRevision
generator.lastRevision.format=r{0,number,00000}
... will use last revision. Eg creates: com.example.myplugin_1.0.0.r1234 for revision 1234.

To use build date:
qualifier.replacement.*=generator:buildTimestamp
generator.buildTimestamp.format='I'yyyyMMdd'-'HHmm
... uses a timestamp with some constant text ('I', '-'). Eg creates com.example.myplugin_1.0.0.I20110920-1408

Buckminster RCP build with independent features

Information:
Buckminster does not seem to be very active anymore. To build Eclipse products, update sites and similar have a look at my tycho tutorials. My Buckminster tutorials are no longer maintained and remein here as reference only.


When building an RCP application all features are typically part of the product. For example the product we built in my previous post contains the Eclipse Platform and a custom feature.


Now when it comes to updates P2 only regards its root nodes. So when you want to update your custom feature only you will soon run into problems. Andrew Niefer wrote a nice blog entry on this topic.

What we want to do is to install a core product only and afterwards install independent features that are not referenced from the base product. This way all these features can be updated independently.

Concept

We first will create a P2 update site containing everything our final installation might need. The product, RCP stuff like platform launchers and optional features. Afterwards we will use this update site to assemble independent features to our final RCP application.

Our final setup will include 6 Plug-ins/Features, 2 Plug-ins containing code, 2 Features each containing one of the Plug-ins and 2 assembly projects. You can see their dependencies on the diagram below:


 We will start by using the code from our previous examples for publishing an update site and for an RCP build as a basis.

Step 1: Updating the update site

The update site shall include code needed for the RCP Feature, so we need to add it to the Included Features. Open com.example.update.p2/features.xml and add com.example.rcp.feature to the list of Included Features.

This will trigger a build for the RCP core feature when the update site is built.

Step 2: Adapting target platform

If you only build for your development platform you can skip this step.

We need to add the Delta Pack to our target platform we defined for the RCP build. Download the delta pack from Eclipse. Go to http://download.eclipse.org/eclipse/downloads/, switch to the 3.x downloads. Afterwards select your release from Latest Releases, find and download the Delta Pack. This package contains platform specific executables so we can build eg a linux RCP on windows.
 Go to Window -> Preferences -> Plug-in Development -> Target Platform. Edit your custom Target Definition and add the location of the eclipse folder located inside the downloaded zip.

You can find a more detailed example on the Target Platform by Ralf Ebert.

Step 3: RCP Build Project

Our com.example.rcp.releng project needs some updates. First we update the ant file build/createProduct.ant.
<project>
     <pathconvert property="equinox.launcher.jar">
       <first count="1">
         <sort>
           <fileset dir="${eclipse.home}/plugins" includes="**/org.eclipse.equinox.launcher_*.jar"/>
           <reverse xmlns="antlib:org.apache.tools.ant.types.resources.comparators">
             <date/>
           </reverse>
         </sort>
       </first>
     </pathconvert>
    
    <target name="create.product">
        <property name="installableIUs" value="${iu},${features}" />        
        <property name="destination" location="${sp:destination}"/>
        <delete dir="${destination}"/>
        <mkdir dir="${destination}"/>
        <makeurl property="repository" file="${sp:updateSite}"/>
        <echoproperties/>
        <echo message="============================== RCP Settings =============================="/>
        <echo message="Repository:  ${repository}"/>
        <echo message="Destination: ${destination}"/>
        <echo message="Product:     ${iu}"/>
        <echo message="Features:    ${features}"/>
        <echo message="IUs:         ${installableIUs}"/>
        <echo message="target:      ${target.os}.${target.ws}.${target.arch}"/>
        <echo message="============================== Building RCP =============================="/>
        <java jar="${equinox.launcher.jar}" fork="true" failonerror="true" >
            <arg value="-application"/>
            <arg value="org.eclipse.equinox.p2.director"/>
            <arg value="-repository"/>
            <arg value="${repository}"/>
            <arg value="-destination"/>
            <arg value="${destination}"/>
            <arg value="-profile"/>
            <arg value="${product.profile}"/>
            <arg value="-profileProperties" />
            <arg value="org.eclipse.update.install.features=true" />
            <arg value="-installIU"/>
            <arg value="${installableIUs}"/>
            <arg value="-p2.os" />
            <arg value="${target.os}" />
            <arg value="-p2.ws" />
            <arg value="${target.ws}" />
            <arg value="-p2.arch" />
            <arg value="${target.arch}" />
            <arg value="-consoleLog"/>
            <arg value="-roaming"/>
        </java>
    </target>
</project>
The director used for the build process now gets a list of installable units (IUs). This list includes our product followed by all independent features we wish to install.

Now change buckminster.cspex to
<?xml version="1.0" encoding="UTF-8"?>
<cspecExtension xmlns:com="http://www.eclipse.org/buckminster/Common-1.0"
    xmlns="http://www.eclipse.org/buckminster/CSpec-1.0">

    <dependencies>
        <dependency name="com.example.update.p2" componentType="eclipse.feature" />
    </dependencies>
    <actions>
        <public name="create.product" actor="ant">
            <actorProperties>
                <property key="buildFile" value="build/createProduct.ant" />
                <property key="targets" value="create.product" />
            </actorProperties>
            <properties>
                <property key="profile" value="${product.profile}" />
                <property key="iu" value="${product.id}" />
                <property key="features" value="${product.features}" />
            </properties>
            <prerequisites alias="updateSite">
                <attribute name="site.p2.publish" component="com.example.update.p2" />
            </prerequisites>
            <products alias="destination" base="${product.destination}">
                <path path="${product.name}.${target.ws}.${target.os}.${target.arch}/" />
            </products>
        </public>

        <public name="create.product.zip" actor="ant">
            <actorProperties>
                <property key="buildFileId" value="buckminster.pdetasks" />
                <property key="targets" value="create.zip" />
            </actorProperties>
            <prerequisites alias="action.requirements">
                <attribute name="create.product" />
            </prerequisites>
            <products alias="action.output" base="${product.destination}">
                <path path="${product.name}.${target.ws}.${target.os}.${target.arch}.zip" />
            </products>
        </public>
    </actions>
</cspecExtension>
This will give us 2 new actions: 
  • create.product to build our RCP applicaton
  • create.product.zip which will build and zip our application.

Finally change buckminster_product.properties to
# Where all the output should go
buckminster.output.root=C:/Build/BuildArtifacts

# Where the temp files should go
buckminster.temp.root=${user.home}/tmp

# How .qualifier in versions should be replaced
qualifier.replacement.*=generator:lastRevision

# update site settings
updatesite.destination=C:/Build/UpdateSite

# rcp settings
product.id=com.example.rcp.core.myproduct
product.name=MyProduct

# leave empty when no features are needed, but do NOT comment this out
# multiple features can be defined as a comma separated list
product.features=com.example.myfeature.feature.group
product.profile=ExampleProfile

product.destination=C:/Build/Sample RCP

target.os=win32
target.ws=win32
target.arch=x86
This property file is used for building the update site and the product. Therefore we need some update site properties too.
  • product.name
    will be used for the product build folder and the zip file. It will not be used anywhere else.
  • product.features
    a comma separated list of all features that should be installed independently from the base product. So if your base product already includes FeatureA, do not add it here! The property may be left empty. In this case you will get the same results as from Buckminster RPC build.
     
  • product.profile
    name of the P2 profile to be created. This will be part of your final RPC application
  • target.X
    Needs to be set to a defined target platform. We cannot use * here anymore as we need to build an RCP dedicated to a specific platform.

    Building for a dedicated platform also influences the content of our update site. All Plug-ins/Features built using this properties file will be built for the defined target only. This might be of interest when you use code that is platform dependent. You still can build your update site only to keep it platform independent.

Step 4: Build the product

When you are done right click on your com.example.rcp.releng project and select Buckminster -> Invoke Action... 

Select create.product and enter the path to your buckminster_product.properties file. After hitting OK you can find your RCP product in C:\Build\Sample RCP.

Our product consists of the consists of the core product My RCP Example which includes the Platform and a custom made Feature My Base Features. Additionally it contains another feature Myfeature that is independent of the core product. Hence we can update Myfeature without updating My RCP Example.


Tuesday, September 13, 2011

Buckminster RCP Build

Information:
Buckminster does not seem to be very active anymore. To build Eclipse products, update sites and similar have a look at my tycho tutorials. My Buckminster tutorials are no longer maintained and remein here as reference only.


In my previous post we were pubishing an update site via Buckminster. Now we are going to build our RCP product.There is a nice tutorial from Ralf Ebert on this topic and this post makes heavy use of it.

Source code for this tutorial is available on googlecode as a single zip archive, as a Team Project Set or you can checkout the SVN projects directly.

Step 1: Create target definition

Open the global preferences and navigate to Plug-in Development -> Target Platform. Create a new target with Add... and select Nothing: Start with an empty target definition. Add... components from a Software Site. Add the Indigo update site (http://download.eclipse.org/releases/indigo). Deselect Group by Category and Include required software. Check Include all environments and reactivate Include required software. Afterwards add
  • Eclipse Platform Launchers
  • Eclipse Platform SDK (not necessarily needed for you RCP)
  • Eclipse RCP SDK

Click Finish. You should end up with a target definition like this:


Name your target accordingly. After creation make sure your target is activated.

Step 2: Create product

Create a new Plug-in project called com.example.rcp.core. We do not want an Activator, contributions to the UI or create an RCP. So deactivate all of them.
Within the Plug-in create a new Product Configuration named example.product. Now we need to define our product in detail. Set the Name to "My RCP Example", then click on New... to create a Product Definition.
Set the Product ID to myproduct and the Application to org.eclipse.ui.ide.workbench.


By creating the Product Definition a plugin.xml file is created. Add it to your build.properties file.

Create a new Feature Project called com.example.rcp.feature and set the Feature Name to My Base Features. Add org.eclipse.platform to the included features. Add com.example.rcp.core to the Plug-ins.

Now back to our product: select the product configuration is based on features. On the Dependencies tab add
  • org.eclipse.platform
  • com.example.rcp.feature
Give it a try by launching your product from the overview tab.

Step 3: Create build environment

We are creating a separate project for release engineering and for opur build files. So create a new Feature Project called com.example.rcp.releng. Add com.example.rcp.feature to the Included Features.

Create a new file buckminster_product.properties and add following content:
# Where all the output should go
buckminster.output.root=${user.home}/Build/Example RCP

# Where the temp files should go
buckminster.temp.root=${user.home}/tmp

# How .qualifier in versions should be replaced
qualifier.replacement.*=generator:lastRevision

product.id=com.example.rcp.core.myproduct
product.profile=ExampleProfile

# Windows 32
target.os=win32
target.ws=win32
target.arch=x86

# Linux
#target.os=linux
#target.ws=gtk
#target.arch=x86
The product.id needs to match with the Product identifier from the Product Definition (highlighted red in the screenshot above).

Now we need a new action for buckminster. We create one by adding a file buckminster.cspex with following content:
<?xml version="1.0" encoding="UTF-8"?>
<cspecExtension xmlns:com="http://www.eclipse.org/buckminster/Common-1.0"
                    xmlns="http://www.eclipse.org/buckminster/CSpec-1.0">
    <actions>
        <public name="create.product" actor="ant">
            <actorProperties>
                <property key="buildFile" value="build/createProduct.ant" />
                <property key="targets" value="create.product" />
            </actorProperties>
            <properties>
                <property key="profile" value="${product.profile}" />
                <property key="iu" value="${product.id}" />
            </properties>
            <prerequisites alias="repository">
                <attribute name="site.p2" />
            </prerequisites>
            <products alias="destination" base="${buckminster.output}">
                <path path="${target.ws}.${target.os}.${target.arch}/" />
            </products>
        </public>
    </actions>
</cspecExtension>
This action refers to an ant file build/createProduct.ant which we need to create now.
<project>
     <pathconvert property="equinox.launcher.jar">
       <first count="1">
         <sort>
           <fileset dir="${eclipse.home}/plugins" includes="**/org.eclipse.equinox.launcher_*.jar"/>
           <reverse xmlns="antlib:org.apache.tools.ant.types.resources.comparators">
             <date/>
           </reverse>
         </sort>
       </first>
     </pathconvert>

    <target name="create.product">
        <property name="destination" location="${sp:destination}"/>
        <delete dir="${destination}"/>
        <makeurl property="repository" file="${sp:repository}"/>
        <mkdir dir="${destination}"/>
        <echoproperties/>
        <echo message="Repository:  ${repository}"/>
        <echo message="Destination: ${destination}"/>
        <echo message="IU:          ${iu}"/>
        <java jar="${equinox.launcher.jar}" fork="true" failonerror="true" >
            <arg value="-application"/>
            <arg value="org.eclipse.equinox.p2.director"/>
            <arg value="-repository"/>
            <arg value="${repository}"/>
            <arg value="-destination"/>
            <arg value="${destination}"/>
            <arg value="-profile"/>
            <arg value="${profile}"/>
            <arg value="-profileProperties" />
            <arg value="org.eclipse.update.install.features=true" />
            <arg value="-installIU"/>
            <arg value="${iu}"/>
            <arg value="-p2.os" />
            <arg value="${target.os}" />
            <arg value="-p2.ws" />
            <arg value="${target.ws}" />
            <arg value="-p2.arch" />
            <arg value="${target.arch}" />
            <arg value="-consoleLog"/>
            <arg value="-roaming"/>
        </java>
    </target>
</project>
Step 4: Executing the build job

Right click on your com.example.rcp.releng project and select Buckminster -> Invoke Action... Select create.product and add the location of your buckminster_product.properties file. Hit OK and wait for the build to finish.

You can find your final product under

${user.home}/Build/Example RCP/com.example.rcp.releng_1.0.0-eclipse.feature/win32.win32.x86
The Installation Details list our product with its sub components as we declared them in our Product Configuration.


Details: How things work together

When the build process is started, buckminster first creates a P2 update site containing all the features and plugins referenced from the com.example.rcp.releng feature. This will create a repository for our RCP installation afterwards. If our RCP needs additional stuff, we need to take care that we add these dependencies to our releng feature.

Once the update site is done, buckminster calls the director app - a special eclipse application used for headless installs of installable units (IUs, like products or features) and installs the given product to a dedicated location. Therefore it uses the pre-built update site as install repository.

The buckminster create.product.action collects some parameters from the properties file, builds the P2 update site and then triggers the ant file which actually handles the install process.

Adapt to your own needs

Typically you would create your own product with its own dependencies. Once you have a runnable product, create a releng Feature Project like in step 3. Change the product.id in the buckminster_product.properties file and add your product dependencies to the Included Features of your releng Feature Project.


Monday, September 12, 2011

Publishing a Buckminster Update Site

Information:
Buckminster does not seem to be very active anymore. To build Eclipse products, update sites and similar have a look at my tycho tutorials. My Buckminster tutorials are no longer maintained and remein here as reference only.


Building a p2 update site with Buckminster is fairly easy. Following the tutorial "Building a p2 Update Site" from BuckyBook will give you a working update site in minutes. What I was missing was some way to publish the resulting p2 site automatically. Fortunately Buckminster actions can easily be extended. What we want to do is create a new ant task that copies over the p2 site to a user defined location.

Source code for this tutorial is available on googlecode as a single zip archive, as a Team Project Set or you can checkout the SVN projects directly.

Step 1: Prerequisites

Before we can extend our build process we need to create an update site according to the Buckminster tutorial.

Plug-in Project

Create a new Plug-in Project named com.example.myplugin. On the 2nd page enable This plug-in will make contributions to the UI. On the 3rd page select the template Plug-in with a view. Leave everything else unchanged.

Feature Project

Create a new Feature Project named com.example.myfeature. Add the plug-in com.example.myplugin to the feature.

Update Site Feature

Buckminster needs a unique Feature Project for building its update site. So create a new Feature Project named com.example.update.p2. Add com.example.myfeature to the included features.

Create a new file called buckminster_p2.properties with following content:
# Where all the output should go
buckminster.output.root=${user.home}/Build/Example P2

# Where the temp files should go
buckminster.temp.root=${user.home}/tmp

# How .qualifier in versions should be replaced
qualifier.replacement.*=generator:lastRevision

target.os=*
target.ws=*
target.arch=*

Creating categories

A nice update site groups its features in categories. So lets create a new Category Definition in com.example.update.p2. The editor is rather straight forward. Create categories with a unique ID and a display Name. Afterwards add your com.example.myfeature feature to the category.


Whenever your feature version number changes, you need to re-add your feature again.
Now right click on your com.example.update.p2 Feature Project and select Buckminster -> Invoke Action...


Select the site.p2 action and enter your buckminster_p2.properties properties file location. After hitting OK your update site will be built. Following this example it will be located at

${user.home}/Example P2/com.example.update.p2_1.0.0-eclipse.feature/site.p2

Step 2: Generating a publish action

To create a publish action we need to create an ant file doing the work and a specification telling buckminster what to do. Lets start by declaring the destination for the publish action.

Open buckminster_p2.properties and add following line

updatesite.destination=${user.home}/Build/UpdateSite


This will be our target destination. Now create a new file buckminster.cspex in your com.example.update.p2 Feature Project with following content:

<?xml version="1.0" encoding="UTF-8"?>
<cspecExtension xmlns:com="http://www.eclipse.org/buckminster/Common-1.0"
                    xmlns="http://www.eclipse.org/buckminster/CSpec-1.0">
    <actions>
        <public name="site.p2.publish" actor="ant">
            <actorProperties>
                <property key="buildFile" value="build/publishUpdateSite.ant" />
                <property key="targets" value="publish.p2" />
            </actorProperties>
            <properties>
                <property key="source" value="${buckminster.output}/site.p2/" />
                <property key="destination" value="${updatesite.destination}" />
            </properties>
            <prerequisites alias="repository">
                <attribute name="site.p2" />
            </prerequisites>
            <products base="${updatesite.destination}" upToDatePolicy="ACTOR"/>
        </public>
    </actions>
</cspecExtension>
Line 5 creates an action called site.p2.publish and delares it an ant task.
Line 7 defines the and build file, line 8 the ant target
Line 11,12 define source and destination properties for the ant task
Line 15 defines the buckminster site.p2 action as a prerequisite. This means that first site.p2 is executed, afterwards our ant task is called.

Finally we need to add our ant task. Create a file build/publishUpdateSite.ant and add following lines:

<project>
    <target name="publish.p2">
        <echo message="Source:      ${source}"/>
        <echo message="Destination: ${destination}"/>
        
        <mkdir dir="${destination}"/>
        <copy todir="${destination}" preservelastmodified="true">
            <fileset dir="${source}"/>
        </copy>
    </target>
</project>
This will create the destination folder if not present and copy the p2 site content to that location.

Step 3: Executing the publish action

Save all files, right click on your com.example.update.p2 Feature Project and select Buckminster -> Invoke Action...
Use site.p2.publish action. Take care that the property file location is still correct. Push OK to publish your update site. You can find your site at C:\Build\UpdateSite

The ant task is rather simple and can easily be extended to eg. use WebDav to upload the content to a webserver or to store the update site to SVN, ...

Alternative: Alter site.p2 action directly

If publishing is just a question of copying files we can do this without our custom action and ant task. Instead we can directly modify the target path of the site.p2 action. Therefore set your buckminster.cspex content to

<?xml version="1.0" encoding="UTF-8"?>
<cspecExtension xmlns:com="http://www.eclipse.org/buckminster/Common-1.0"
                    xmlns="http://www.eclipse.org/buckminster/CSpec-1.0">

    <alterActions>
        <public name="site.p2">
            <products base="${updatesite.destination}/" upToDatePolicy="ACTOR"/>
        </public>
    </alterActions> 
</cspecExtension>

Monday, September 5, 2011

JNI made easy

Using JNI can sometimes be tricky. Getting all the settings right can be a nightmare when done for the first time.
In this tutorial I will use Eclipse with CDT (using MinGW/gcc) to create a simple hello world example. Therefore we will create a Java program, that calls native code from a shared library. Settings for linux and windows differ in some details, so these differences will be explicitely marked.

Source code for this tutorial is available on github as a single zip archive, as a Team Project Set or you can browse the files online.

Step 1: Creating a Java Project

First create a new Java Project called "com.codeandme.jni". Create a class "com.codeandme.jni.JNITest" with following content:
package com.codeandme.jni;

public class JNITest {

     static {
         // load library
         if (System.getProperty("os.name").startsWith("Windows"))
             // windows
             System.loadLibrary("libJNI_Library_windows");

         else
             // linux
             System.loadLibrary("JNI_Library_linux");
     }

     public static void main(final String[] args) {
         new JNITest().hello("world");
     }

     // native method signature
     public native void hello(String name);
}
Line 9/13 will trigger loading of the shared library.
Line 21 declares an external method which is implemented in the native library.

Create a new folder called resources under your project root. This will be the location for our JNI library.
 
Step 2: Create C++ Project

Now we need to create the library code. Therefore create a new C++ Project called "JNI_Library". As Project Type select Shared Library/Empty Project. This will provide reasonable defaults for our build. Create a source folder src within that project.

The header file for the shared functions needs to follow a very specific coding. This is generated by javah, a helper program of your JDK. We will do this by using an external tool helper.
Use Run -> External Tools -> External Tools Configurations... and create a new Program launcher:

Location: C:\Program Files\Java\jdk1.8.0_31\bin\javah.exe
Working Directory: ${workspace_loc:/com.codeandme.jni/bin}
Arguments: -jni -d "${workspace_loc:/JNI_Library_windows/src}" com.codeandme.jni.JNITest

 
This launcher will create a header file within the src folder of our C++ Project. On linux you will have to change the Location to /usr/bin/javah. On the refresh tab you can enable refreshing of the target folder. Otherwise refresh manually after file creation.
Open the project properties of JNI_Library and go to C/C++ General/Paths and Symbols. Select [All Configurations] from the Configuration combo at the top of the dialog.
On the Includes tab add following folders from your JDK to the include paths for GNU C++.

Windows:
  • include
  • include/win32
Linux:
  • include
  • include/linux 

Now we can add our implementation in C++.
Create a new source file within src folder named com_codeandme_jni_JNITest.cpp. Add following content to the file
#include <iostream>

#include "com_codeandme_jni_JNITest.h"

using namespace std;

JNIEXPORT void JNICALL Java_com_codeandme_jni_JNITest_hello
(JNIEnv *env, jobject jthis, jstring data) {

     jboolean iscopy;
     const char *charData = env->GetStringUTFChars(data, &iscopy);
     cout << "Hello " << charData << endl;
     env->ReleaseStringUTFChars(data, charData);
}

Finally we need to adjust our build settings a bit. Open the project properties and go to C/C++ Build/Settings. Switch to the Tool Settings tab:

Windows:
  • GCC C++ Compiler/Miscellaneous: enable Position independent code (-fPIC)
  • GCC C++ Linker/Shared Library Settings: enable Shared (-shared)
  • MinGW C++ Linker/Miscellaneous: add -Wl,--add-stdcall-alias
Linux:
  • GCC C++ Compiler/Miscellaneous: enable Position independent code (-fPIC)
  • GCC C++ Linker/Shared Library Settings: enable Shared (-shared)
The build result needs to be copied over to our java project. We can automate this step with a simple copy command as a Post-Build step on the Build Steps tab:

Windows:
  • xcopy "${BuildArtifactFilePrefix}${BuildArtifactFileName}" "${workspace_loc:/com.codeandme.jni/resources/}" /Y
Linux:
  • cp "${BuildArtifactFilePrefix}${BuildArtifactFileName}" "${workspace_loc:/com.codeandme.jni/resources/}"

This will automatically copy our build product to the Java Project we created at step 1.

Save all settings and build your library. It should be copied over to your Java Project. Refresh your workspace (F5) to see the newly created file.

Step 3: Put it all together

We are almost done. As a final step we need to add the resource folder to the library path of our run target.

Launch your Java program to create a launch target for it. You will get an Exception, don't worry, we'll fix that immediately. Go to Run -> Run Configurations... and find your Java run target (typically named JNITest). On the Arguments tab add

-Djava.library.path="${workspace_loc:/com.codeandme.jni/resources/}"
to VM arguments.

Now launch your Java program and you should get a "Hello world" on your console view.

Further reading

It is also possible to have asynchronous callbacks from C to Java. An example how to do this is available on github.