You can find some documentation on the web like a post from Miles Billsman or a tutorial by Lars Vogel. I am going to sum up things here.
Source code for this tutorial is available on github as a single zip archive, as a Team Project Set or you can browse the files online.
Preparations: A default eclipse IDE RCP
Start by creating a new Plug-in project. This will be no RCP application, nor will it contribute to UI. Just a plain Plug-in. On the overview tab hit Launch an Eclipse application. This will bring up a new Eclipse instance including your Plug-in. Nothing special so far. Now lets start hiding UI elements.
Approach 1: Activities
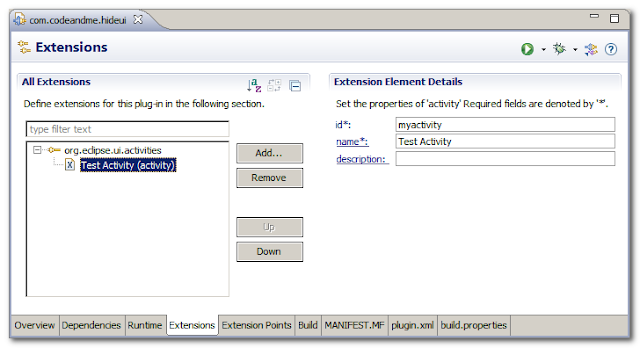
Activities allow to hide UI elements once you know their ID - or at least parts of it. Go to the Extensions tab of your plugin.xml and add a new extension for org.eclipse.ui.activities. Within that extension create a new activity and provide some unique id.

Create a new activityPatternBinding under activities. Refer to your activity ID.
Now for the tricky part: we need to find the ID of an element we want to hide. Then we can pass this ID to pattern to hide the element.
Finding IDs is greatly described in Miles Billsman post, so I will focus on some examples.
 Hiding the Run External Tools Toolbar Item
The Plug-in Menu Spy is a great tool to find out more about menu/toolbar entries. Read more about the Plug-in Spy in Lars Vogels tutorial. So hit Alt-Shift-F2 in your running application and click on the toolbar button you want to examine.
The active action definition identifier is what we are looking for. Copy that ID and paste it to your activityPatternBinding pattern. Pattern could be a regular expression and therefore capture a whole bunch of UI elements at once. We want exact matching, so set isEqualityPattern to true.
Start your application and the toolbar button is gone.
Hiding the Next Annotation Toolbar Item
Unfortunately not all UI elements can be hidden by that ID. For example this does not work for the Next Annotation toolbar item. To hide this element we need to track down its definition within the defining Plug-in.
Therefore open 2 views: Plug-in Registry and Plug-ins. By hovering over the toolbar item we can see a text containing "Next Annotation". Lets use these words in Plug-in Registry to filter for that element.
We can see that this element is provided by the org.eclipse.ui.editors Plug-in. Switch to the Plug-ins view, locate org.eclipse.ui.editors and double click to open its plugin.xml. On the Extensions tab we need to look for the contribution definition. It should be either under org.eclipse.ui.commands or under org.eclipse.ui.actionSets. Once located it is easy to find the needed contribution ID for our activityPatternBinding pattern.
As this element is provided by an action we need to prepend the pattern with the defining Plug-in ID. So the full pattern to apply is:
org.eclipse.ui.editors/org.eclipse.ui.edit.text.gotoNextAnnotation
Approach 2: Perspective Extensions
Some elements simply cannot be hidden with activities. Try the pattern ".*" which should hide all elements. Some of them still remain. With perspective extensions we will hide the Run menu and the Run Eclipse Application toolbar item.
Create a new org.eclipse.ui.perspectiveExtensions extension. Under targetID provide the perspective ID for which the element should be hidden. You can use "*" to match all perspectives. Create a new hiddenMenuItem and add use the ID of the run menu org.eclipse.ui.run. This hides the Run menu completely.
To hide the toolbar entry for Run Eclipse Application use a hiddenToolBarItem and an ID of org.eclipse.debug.internal.ui.actions.RunDropDownAction.
The IDs were found using the Plug-in Registry and by parsing plugin.xml files.
Additional Notes
Generally you should have some idea where to look for a contribution definition. This is the most tricky part and there seems to be no easy way for that.
Keep in mind that we just hid those items. They are still available by using keyboard shortcuts or might be accessed indirectly (eg. the Plug-in Manifest Editor still can Launch an Eclipse application).


