
Last time I tried you could not use custom touchpoint actions that came with the current installation package. It seems eclipse has a but there and does not consider fresh installed actions when it searches for it. So you can only use actions that were installed with a previous installation step.
When you provide a feature via an update site sometimes it would be nice to do extra stuff once the feature is installed. For example we could automatically open a configuration dialog or the welcome screen providing new information.
Before p2 we could use a custom installation handler. Now we need to use touchpoints.
Source code for this tutorial is available on googlecode as a single zip archive, as a Team Project Set or you can checkout the SVN projects directly.
Step 1: Prerequisites
Create a simple Plug-in project called com.example.touchpoint.action. You do not need to provide an Activator or UI components.
Create a Feature project called com.example.custominstall.feature. Add com.example.touchpoint.action to the included Plug-ins.
Step 2: Preparing touchpoint action
There already exist lots of actions which you could use for your own purposes.
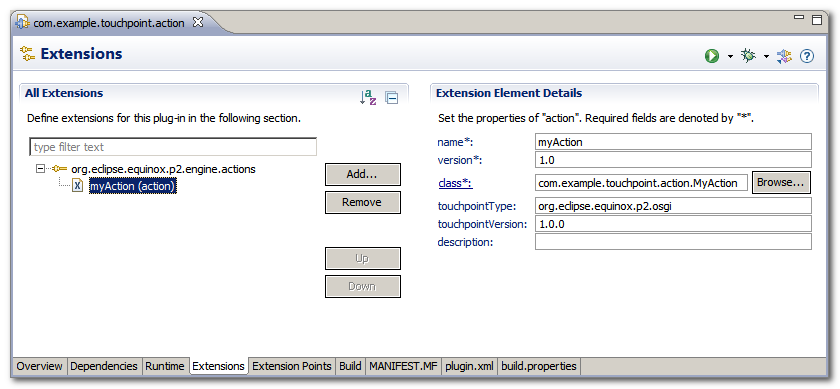
In this example we want to create a new action. Therefore open the plugin.xml from your com.example.touchpoint.action project. Switch to the Extensions tab and add a new action by adding an org.eclipse.equinox.p2.engine.actions extension. Set the touchpointType to org.eclipse.equinox.p2.osgi and find a unique name for your action.
Afterwards create a new class called com.example.touchpoint.action.MyAction.
package com.example.touchpoint.action;

import java.util.Map;

import org.eclipse.core.runtime.IStatus;
import org.eclipse.core.runtime.Status;
import org.eclipse.equinox.p2.engine.spi.ProvisioningAction;
import org.eclipse.jface.dialogs.MessageDialog;
import org.eclipse.swt.widgets.Display;

public class MyAction extends ProvisioningAction {

 @Override
 public IStatus execute(Map<String, Object> parameters) {
  System.out.println("**************************************************** Feature installation");
  for (String key : parameters.keySet())
   System.out.println("Key: " + key + ", value: " + parameters.get(key));

  if (Display.getDefault() != null)
   Display.getDefault().asyncExec(new Runnable() {

    @Override
    public void run() {
     MessageDialog.openInformation(Display.getDefault().getActiveShell(), "Feature installation",
       "Your feature is in the process of being installed.");
    }
   });

  return Status.OK_STATUS;
 }

 @Override
 public IStatus undo(Map<String, Object> parameters) {
  return Status.OK_STATUS;
 }
}
Now we need to register our custom action with p2. Therefore create a new file /META_INF/p2.inf with following content:provides.0.namespace=org.eclipse.equinox.p2.osgi provides.0.name=myAction provides.0.version=1.0Line 2 contains the name parameter of our action definition. The "0" in the key is an index which needs to be incremented if you define multiple actions within the same p2.inf file.
Make sure your p2.inf file is included in your build!

Step 3: Activating install action
We want our action to be called right when our feature is installed. So switch to the com.example.custominstall.feature and create a new file /p2.inf.
metaRequirements.0.namespace=org.eclipse.equinox.p2.osgi
metaRequirements.0.name=myAction
metaRequirements.0.range=1.0

instructions.configure=myAction(key1:value1,key2:value2);
instructions.configure.import=com.example.plugin.myAction
This will call our custom action when our feature is configured. You can find a list of available phases at the end of this wiki entry.
The import and the action need to use the same phase identifier, otherwise the action will not be found.
As you can see from the action implementation the parameters will be stored in a Map<String,String>.
Again make sure to add the p2.inf to the build.
Step 4: Try it out
To give it a try we need to create a p2 repository from which we can install. We can do this quickly by using a special export wizard. Open File / Export... and start the Plug-in Development / Deployable features wizard. Select the feature you want to export and provide a destination directory where the p2 update site should be created.
Afterwards try to install the feature from that directory.
Additional Notes
When your action uses GUI code make sure that a GUI is available. Remember that the action might be run by a headless install.
Once an action is installed, it can be used by other features too. So Action provider and the feature using the action do not necessarily need to be the same.
Hi,
ReplyDeleteI've downloaded example and exported the update site, but during installation I'm keep getting
An error occurred while configuring the installed items
session context was:(profile=SDKProfile, phase=org.eclipse.equinox.internal.p2.engine.phases.Configure, operand=null --> [R]com.example.custominstall.feature.feature.group 1.0.0.201302041815, action=org.eclipse.equinox.internal.p2.engine.MissingAction).
No action found for: com.example.plugin.myAction.
No action found for: com.example.plugin.myAction.
Any ideas?
same here, Are you sure this line is correct? instructions.configure.import=com.example.plugin.myAction
ReplyDeleteI checked and face the same problem. It worked for me for some application at the time of writing. Not sure if I find time to investigate further.
ReplyDeleteThis doesn't work
ReplyDeletechange
ReplyDeleteinstructions.configure.import=com.example.plugin.myAction
(see Step 3, file p2.inf, line 6)
to
instructions.configure.import=com.example.touchpoint.action.myAction