Sunday, March 4, 2012

A new kernel for the dockstar

The dockstar is a small embedded system originally used as a small NAS system. With some effort it is possible to install linux on such a system. When running gentoo it might be necessary to update the kernel from time to time.

All we need is a kernel .config file and a short summary how to update.

Step 1: getting the kernel
emerge --sync
emerge gentoo-sources
Will retrieve the newest sources. As kernel updates will happen rarely you might want to mask newer kernels from portage. Do this by adding following line to /etc/portage/package.mask.
>sys-kernel/gentoo-sources-3.1.10-r1
Step 2: Kernel configuration

Switch to your new kernel:
eselect kernel list
eselect kernel set <number>
Now you could either download one from the config files below or config the kernel on your own.
cd /usr/src/linux
make menuconfig
After configuration you should have a .config file in your linux directory.

Step 3: Build the kernel
make clean uImage modules modules_install
Step 4: Install the kernel

As you might have a running kernel already its best to backup this version first:
mount /boot
mv /boot/uImage /boot/uImage.bak
If your new kernel does not boot you can revert to the old kernel on another system.
cp /usr/src/linux/arch/arm/boot/uImage /boot
Now cross your fingers and reboot the system.

Files:

Thursday, February 23, 2012

Creating a headless application

There are times when you might want to run your RCP application in headless mode. While this is typically not the default mode for applications it might still be useful as an alternative launch option. Eclipse comes with a wizard for this. let' see how it works.

Source code for this tutorial is available on github as a single zip archive, as a Team Project Set or you can browse the files online. 


Step 1: Create the Application

Create a new Plug-in Project called com.codeandme.headless. Eclipse allows to register applications, classes that implement IApplication. At startup eclipse allows to launch exactly one of these classes which is the main entry point to your application.

Lets build such an application: first lets create the extension point for it.
Therefore open the MANIFEST.MF file and switch to the Extensions tab. Add a new org.eclipse.core.runtime.applications extension. Create a new run subnode and set the class name to com.codeandme.headless.Application. The ID of our application will be comprised of the plugin name followed by the ID of the root node of the extension. So lets set the ID to application. The final plugin.xml should look like this:
<?xml version="1.0" encoding="UTF-8"?>
<?eclipse version="3.4"?>
<plugin>

   <extension
         id="application"
         point="org.eclipse.core.runtime.applications">
      <application
            cardinality="singleton-global"
            thread="main"
            visible="true">
         <run
               class="com.codeandme.headless.Application">
         </run>
      </application>
   </extension>
</plugin>
Clicking on the class link creates the java class:
package com.codeandme.headless;

import java.util.Map;

import org.eclipse.equinox.app.IApplication;
import org.eclipse.equinox.app.IApplicationContext;

/**
 * This class controls all aspects of the application's execution
 */
public class Application implements IApplication {

 @Override
 public Object start(final IApplicationContext context) throws Exception {
  System.out.println("Hello RCP World!");
  final Map<?,?> args = context.getArguments();
  final String[] appArgs = (String[]) args.get("application.args");
  for (final String arg : appArgs) {
   System.out.println(arg);
  }

  return IApplication.EXIT_OK;
 }

 @Override
 public void stop() {
  // nothing to do
 }
}

Instead of a java main() we now have to implement start() and stop(). We are not interested in UI here, so we simply print some messages to the console and finish.

Step 2: A simple test run

Open the Launch Configurations and add a new Eclipse Application launch. On the main tab activate Run an application and select com.codeandme.headless.application. Make sure all required plug-ins are selected and give it a try. You should get some print outputs on the console.


Step 3: Create a Product Configuration

We will create a very basic product configuration here just to get a working runnable.

Select our Plug-in com.codeandme.headless, and select New -> Product Configuration from the context menu. Set the File name to "Headless" and select "Create a configuration file with basic settings".


On the Overview tab find the section Product Definition and hit the New... button on the righthand side of the Product line.

Enter a nice Product Name and a unique Product ID. Make sure the Application is set to com.codeandme.headless.application. The Defining Plug-in needs to be part of your exported RCP, in our case we will simply use com.codeandme.headless for this purpose.


Switch over to the Contents tab and add com.codeandme.headless. Further add the plugin org.eclipse.core.runtime, then select Add Required Plug-ins to automatically resolve all dependencies. Save your Product Configuration and test it by selecting Launch an Eclipse application on the Overview tab. Again you should see the output on the Console view.

Step 4: Exporting the RCP Product

Start the Eclipse Product export wizard from the Overview tab of the Product Configuration. Just select an appropriate destination Directory and let the wizard do the rest. In case you do this multiple times it might help to manually wipe the destination directory before starting a new export.

This way of building products is fine for a test run, if you are interested in a more  professional way of building products, have a look at my tycho tutorials.

Step 5: Running the Application

To run the application just double click eclipse.exe in the destination directory. Still this won't give you any output. So fire up a console and enter

eclipse -application com.codeandme.headless.application -consoleLog -noExit first second last
  • -application
    will tell eclipse which application to start. You might omit this if you want to run the default application you exported. It makes sense for RCPs with multiple applications though.
  • -consoleLog
    opens a dedicated eclipse console and should be well known already.
  • -noExit
    will keep eclipse running even if our application finished. It keeps the console open to examine output 
The other parameters are passed to our application and therefore will be parsed and printed.

Monday, February 6, 2012

Eclipse integrated JavaScript Interpreter

I am working on an integration of Rhino (a Java based JavaScript interpreter) into the Eclipse IDE. Target is to execute JavaScript code directly within the running Eclipse environment. Such an interpreter might be used to script Eclipse itself. Wouldn't it be nice to have macro support?

Therefore I raised bug 365133. As I finally was able to post some code I'd like to give a short overview of what can be done.

Run Plug-ins

You need at least Eclipse 3.7 with JSDT tools installed (get them from the Indigo repository).

Import all four projects from the archive to your workspace. Right click one one of them in Package Explorer and select Run As -> Eclipse Application.

JavaScript Shell

Before we have a look at the integrated JS shell we will quickly adjust some settings: open menu Window -> Preferences and navigate to JavaScript -> Shell. Set all output values to "Shell".

Now open the shell view: select menu Window -> Show View -> Other... Then open view JavaScript -> JavaScript Shell.

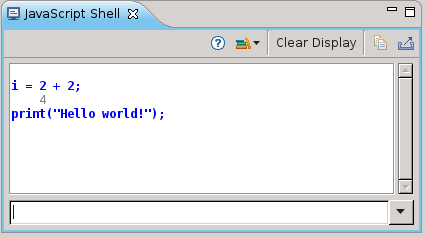
The shell consists of a big output pane and an input line at the bottom. Start entering your first JS code there:
i = 2+2;
You will see the result right in the output pane. There is a print command available that will dump text to the Console view.
print("Hello world!");


An integrated help is available when hitting the help toolbar button.

JavaScript Run target

To execute JavaScript files there exists a new run target that allows to right click any JS source file and select Run As -> JavaScript. This will create a new interpreter (so it will not run in the same context as the shell) and execute the file.

Loadable Modules

For developers there exists an interesting Plug-in: com.example.javascript.modules.tools. It is an example how to extend JS functionality. Every method within this class augmented with @WrapToJavaScript
will be available as JS function automagically. This way JS functionality can be easily extended while using the benefits of Java.


Due to Rhino and the used ClassLoader it is possible to mix JavaScript code and pure Java classes. Eg the following JS code will create an instance of java.io.File and call a method upon it:
var myFile = new Packages.java.io.File("~/.bashrc");
print(myFile.exists());


Wrap up

Having a native JS interpreter within Eclipse will provide great new ways to build applications. It might give us macro support, rapid testing facilities for programmers (just load your Plug-in and access it with the Script Shell) and maybe a lot more things I can currently not think of.

If you want to support this idea please vote on bug 365133 or help in finding ways to make this part of Eclipse.

Wednesday, November 16, 2011

Welcome Page

Today we will have a look at the welcome screen. We will start by following A short tutorial on Intro/Welcome. Then we will add a custom entry to the news section. Finally we are going to implement code to trigger the welcome screen a second time.

Source code for this tutorial is available on googlecode as a single zip archive, as a Team Project Set or you can checkout the SVN projects directly.

Step 1: Creating a basic product

Create a new Plug-in project called com.codeandme.welcome. We do not need an Activator nor contributions to the UI.

An Intro needs a product, so we need to create one. Therefore create a new Product Configuration with basic settings. Name your product file Example.product.


In the Product Definition click on New... and set the Product ID to example. Select the Application org.eclipse.ui.ide.workbench. This will start the default workbench. For a real life implementation you would of course use your own application here.


Back at the product definition save and click Launch an Eclipse Application. This will create a new launch configuration and furthermore synchronize the product definition with the plugin.xml. Changes of the product definition will not automatically be synchronized so remember to hit either Synchronize or Launch an Eclipse Application on any change.

Step 2: Defining the Intro


Switch to the Extensions tab of your plugin.xml. Add a new extension for org.eclipse.ui.intro. Add a new introProductBinding to it. Enter your productId com.codeandme.welcome.product and the introId of the universal intro org.eclipse.ui.intro.universal.

Make sure your plugin dependencies include org.eclipse.ui.intro and org.eclipse.ui.intro.universal.


Now add some branding to the intro by adding properties to the product definition. Add a property introBrandingImage for the logo in the upper left corner. Set product:<path/to/image.png> as property value and put the image into the com.example.welcome Plug-in. Add another property introTitle containing the main heading of your welcome page.

Your final plugin.xml should look like this:
<?xml version="1.0" encoding="UTF-8"?>
<?eclipse version="3.4"?>
<plugin>
   <extension
         point="org.eclipse.ui.intro">
      <introProductBinding
            introId="org.eclipse.ui.intro.universal"
            productId="com.example.welcome.product">
      </introProductBinding>
   </extension>
   <extension
         id="product"
         point="org.eclipse.core.runtime.products">
      <product
            application="org.eclipse.ui.ide.workbench"
            name="example">
         <property
               name="introBrandingImage"
               value="product:images/logo.png">
         </property>
         <property
               name="introTitle"
               value="My Example RCP Application">
         </property>
      </product>
   </extension>
</plugin>

Finally we need to add a theme for our intro. Therefore create a file plugin_customization.ini in the root directory of your Plug-in with following content:
org.eclipse.ui.intro/INTRO_THEME = org.eclipse.ui.intro.universal.slate
org.eclipse.ui.intro.universal/INTRO_ROOT_PAGES = overview,tutorials,samples,whatsnew,webresources
Line 2 lists all the root pages that should be available. Adapt this list to your own needs.

Save and launch your product to see the welcome page in its full beauty. If you do not see the welcome screen you might have forgotten to clear your workspace. You can activate this setting in your launch configuration on the Main tab.

Step 3: Adding content to the Whats New section

Open the Extensions tab of your plugin.xml. Now add an extension for org.eclipse.ui.intro.configExtension and use the template Universal Welcome Contribution.


The wizard lets you select where to place content and creates sample files automatically.


By editing /intro/sample.xml you can easily adapt the example to your needs.

Reactivating welcome screen

Eclipse will automatically deactivate the welcome screen once it was presented to the user. Sometimes you might want to reactivate the screen for the next workbench startup. You can do this with this line of code.

PlatformUI.getPreferenceStore().setValue(IWorkbenchPreferenceConstants.SHOW_INTRO, true);

You might want to use this to display news after an update. Therefore you can combine this with a Custom Installation Step.

Wednesday, November 9, 2011

Custom Installation Step

Update:
Last time I tried you could not use custom touchpoint actions that came with the current installation package. It seems eclipse has a but there and does not consider fresh installed actions when it searches for it. So you can only use actions that were installed with a previous installation step.


When you provide a feature via an update site sometimes it would be nice to do extra stuff once the feature is installed. For example we could automatically open a configuration dialog or the welcome screen providing new information.

Before p2 we could use a custom installation handler. Now we need to use touchpoints.

Source code for this tutorial is available on googlecode as a single zip archive, as a Team Project Set or you can checkout the SVN projects directly.

Step 1: Prerequisites

Create a simple Plug-in project called com.example.touchpoint.action. You do not need to provide an Activator or UI components.

Create a Feature project called com.example.custominstall.feature. Add com.example.touchpoint.action to the included Plug-ins.

Step 2: Preparing touchpoint action

There already exist lots of actions which you could use for your own purposes.

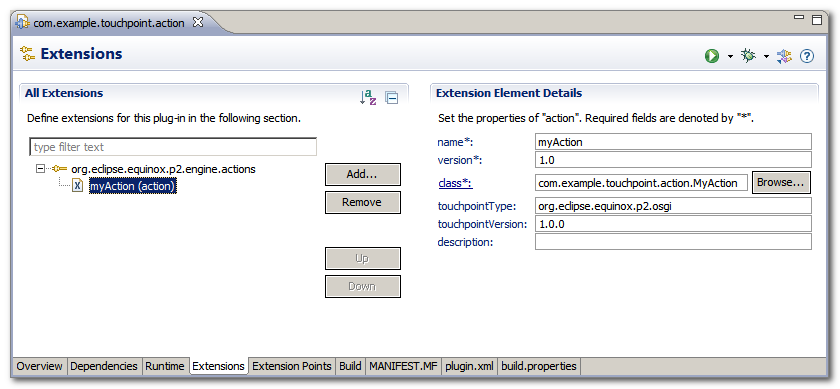
In this example we want to create a new action. Therefore open the plugin.xml from your com.example.touchpoint.action project. Switch to the Extensions tab and add a new action by adding an org.eclipse.equinox.p2.engine.actions extension. Set the touchpointType to org.eclipse.equinox.p2.osgi and find a unique name for your action.


Afterwards create a new class called com.example.touchpoint.action.MyAction.
package com.example.touchpoint.action;

import java.util.Map;

import org.eclipse.core.runtime.IStatus;
import org.eclipse.core.runtime.Status;
import org.eclipse.equinox.p2.engine.spi.ProvisioningAction;
import org.eclipse.jface.dialogs.MessageDialog;
import org.eclipse.swt.widgets.Display;

public class MyAction extends ProvisioningAction {

 @Override
 public IStatus execute(Map<String, Object> parameters) {
  System.out.println("**************************************************** Feature installation");
  for (String key : parameters.keySet())
   System.out.println("Key: " + key + ", value: " + parameters.get(key));

  if (Display.getDefault() != null)
   Display.getDefault().asyncExec(new Runnable() {

    @Override
    public void run() {
     MessageDialog.openInformation(Display.getDefault().getActiveShell(), "Feature installation",
       "Your feature is in the process of being installed.");
    }
   });

  return Status.OK_STATUS;
 }

 @Override
 public IStatus undo(Map<String, Object> parameters) {
  return Status.OK_STATUS;
 }
}
Now we need to register our custom action with p2. Therefore create a new file /META_INF/p2.inf with following content:
provides.0.namespace=org.eclipse.equinox.p2.osgi
provides.0.name=myAction
provides.0.version=1.0
Line 2 contains the name parameter of our action definition. The "0" in the key is an index which needs to be incremented if you define multiple actions within the same p2.inf file.

Make sure your p2.inf file is included in your build!


Step 3: Activating install action

We want our action to be called right when our feature is installed. So  switch to the com.example.custominstall.feature and create a new file /p2.inf.
metaRequirements.0.namespace=org.eclipse.equinox.p2.osgi
metaRequirements.0.name=myAction
metaRequirements.0.range=1.0

instructions.configure=myAction(key1:value1,key2:value2);
instructions.configure.import=com.example.plugin.myAction
This will call our custom action when our feature is configured. You can find a list of available phases at the end of this wiki entry.

The import and the action need to use the same phase identifier, otherwise the action will not be found.
As you can see from the action implementation the parameters will be stored in a Map<String,String>.

Again make sure to add the p2.inf to the build.

Step 4: Try it out

To give it a try we need to create a p2 repository from which we can install. We can do this quickly by using a special export wizard. Open File / Export... and start the Plug-in Development / Deployable features wizard. Select the feature you want to export and provide a destination directory where the p2 update site should be created.

Afterwards try to install the feature from that directory.

Additional Notes

When your action uses GUI code make sure that a GUI is available. Remember that the action might be run by a headless install.

Once an action is installed, it can be used by other features too. So Action provider and the feature using the action do not necessarily need to be the same.

Friday, October 28, 2011

Form editor with XML source view

Form based editors seem to be everywhere nowadays. They provide a great way for the user to operate on complex file types like xml files. Building a forms based editor similar to the PDE Plug-in Editor is quite easy.

Source code for this tutorial is available on github as a single zip archive, as a Team Project Set or you can browse the files online.


Step 1: Defining the editor

Create a new Plug-in Project called com.codeandme.multiparteditor.

I already showed how to reuse the XML source editor, so I will keep the editor definition part rather short: Define an editor and a content type in your plugin.xml. It should look like this afterwards:
<?xml version="1.0" encoding="UTF-8"?>
<?eclipse version="3.4"?>
<plugin>
   <extension
         point="org.eclipse.ui.editors">
      <editor
            class="com.codeandme.multiparteditor.SampleEditor"
            default="false"
            id="com.codeandme.editor.sampleEditor"
            name="Sample Editor">
         <contentTypeBinding
               contentTypeId="com.codeandme.contenttype.sample">
         </contentTypeBinding>
      </editor>
   </extension>
   <extension
         point="org.eclipse.core.contenttype.contentTypes">
      <content-type
            base-type="org.eclipse.core.runtime.xml"
            file-extensions="sample"
            id="com.codeandme.contenttype.sample"
            name="Sample File"
            priority="normal">
      </content-type>
   </extension>

</plugin>
Switch to the Dependencies tab and add following dependencies:
  • org.eclipse.core.resources
  • org.eclipse.core.runtime
  • org.eclipse.text
  • org.eclipse.ui
  • org.eclipse.ui.editors
  • org.eclipse.ui.forms
  • org.eclipse.ui.ide
  • org.eclipse.wst.sse.ui
  • org.eclipse.wst.xml.core

Step 2: Implementing the editor

Create a new Class com.codeandme.multiparteditor.SampleEditor
package com.codeandme.multiparteditor;

import org.eclipse.core.runtime.IProgressMonitor;
import org.eclipse.ui.IEditorInput;
import org.eclipse.ui.IEditorSite;
import org.eclipse.ui.PartInitException;
import org.eclipse.ui.forms.editor.FormEditor;
import org.eclipse.wst.sse.ui.StructuredTextEditor;

public class SampleEditor extends FormEditor {

 private StructuredTextEditor fSourceEditor;
 private int fSourceEditorIndex;

 @Override
 public void init(final IEditorSite site, final IEditorInput input) throws PartInitException {
  super.init(site, input);

  // TODO: load your model here
 }

 @Override
 protected void addPages() {
  fSourceEditor = new StructuredTextEditor();
  fSourceEditor.setEditorPart(this);

  try {
   // add form pages
   addPage(new FirstForm(this, "firstID", "First Page"));

   // add source page
   fSourceEditorIndex = addPage(fSourceEditor, getEditorInput());
   setPageText(fSourceEditorIndex, "Source");
  } catch (final PartInitException e) {
   // TODO Auto-generated catch block
   e.printStackTrace();
  }
 }

 @Override
 public void doSaveAs() {
  // not allowed
 }

 @Override
 public boolean isSaveAsAllowed() {
  return false;
 }

 @Override
 public void doSave(IProgressMonitor monitor) {
  throw new RuntimeException("To be implemented");
 }
}
That's all you need for your very first FormEditor.

Step 3: Add form pages

Create additional FormPages and add them to your editor. This is best done using WindowBuilder by using the New Wizard: WindowBuilder/SWT Designer/Forms/FormPage.

There are lots of tutorials out there, see here, here, or here to get you going.

Step 4: Keeping your model consistent

As we have multiple parts within our editor that modify the same source, we need some synchronization mechanism. The source editor already operates on a Document and updates its content accordingly. So our FormPages could operate on the same Document but this would result in lots of XML parsing. There are great tools for this out there, however in this example we will use another approach:

The main editor will maintain a model and inform and update an EditorPart before it is activated. That model can import and export its state to XML, which we will use to synchronize model and source editor.

All form pages should modify the model directly. When the editor page is changed, the activated page will be notified to update itself regarding new model data.

Open the SampleEditor and add following code at the end of the addPages() method:
        // add listener for changes of the document source
        getDocument().addDocumentListener(new IDocumentListener() {

            @Override
            public void documentAboutToBeChanged(final DocumentEvent event) {
                // nothing to do
            }

            @Override
            public void documentChanged(final DocumentEvent event) {
                fSourceDirty = true;
            }
        });
The listener will be notified whenever the source editor is editing the document. We use an internal flag to indicate that our form pages need an update.

Additionally add/exchange following methods:
     /** Keeps track of dirty code from source editor. */
    private boolean fSourceDirty = false;

    @Override
    public void doSave(final IProgressMonitor monitor) {
        if (getActivePage() != fSourceEditorIndex)
            updateSourceFromModel();

        fSourceEditor.doSave(monitor);
    }

    @Override
    protected void pageChange(final int newPageIndex) {
        // check for update from the source code
        if ((getActivePage() == fSourceEditorIndex) && (fSourceDirty))
            updateModelFromSource();

        // check for updates to be propagated to the source code
        if (newPageIndex == fSourceEditorIndex)
            updateSourceFromModel();

        // switch page
        super.pageChange(newPageIndex);

        // update page if needed
        final IFormPage page = getActivePageInstance();
        if (page != null) {
            // TODO update form page with new model data
            page.setFocus();
        }
    }

    private void updateModelFromSource() {
        // TODO update source code for source viewer using new model data
        fSourceDirty = false;
    }

    private void updateSourceFromModel() {
        // TODO update source page from model
        // getDocument().set("new source code");
        fSourceDirty = false;
    }

    private IDocument getDocument() {
        final IDocumentProvider provider = fSourceEditor.getDocumentProvider();
        return provider.getDocument(getEditorInput());
    }

    private IFile getFile() {
        final IEditorInput input = getEditorInput();
        if (input instanceof FileEditorInput)
            return ((FileEditorInput) input).getFile();

        return null;
    }

    private String getContent() {
        return getDocument().get();
    }


doSave() on line 5 uses the source page save routine. Therefore we need to make sure, the source code is up to date.

pageChange() on line 13 first checks if we need to either update the model from the source code or the source code from the model. This happens whenever we switch from/to the source view. After the page is switched we check whether the new page is a form page. If so, we need to update the form page (see line 28). This could be done by calling page.setFocus(); and overwrite setFocus() in the FormPage implementation.

Methods getDocument(), getFile(), getContent() are there for your convenience. You can delete the latter two if you don't need them.

Monday, October 24, 2011

Reusing XML source editor

The Web Tools Platform Project from Eclipse features a nice XML editor which you can find at various places within the IDE. It is generally used to edit xml files, but you can also find it in the Plug-in Editor when editing the source of plugin.xml directly.

When you have your own config files that store xml content you can extend the default editor and bind it to your content. Basically you may achieve the same result by simply creating a new File Association (Preferences/General/Content Types) for your file type, but as we want to extend the editor in a later tutorial, we will provide an editor extension.

Source code for this tutorial is available on github as a single zip archive, as a Team Project Set or you can browse the files online.

Step 1: Defining content type

Create a new Plug-in project called com.codeandme.editor. Do not add an Activator or UI elements. Go to the Extensions tab of your plugin.xml and add a new extension for org.eclipse.core.contenttype.contentTypes. Right click and select New -> content-type.

Name your content type and select a unique id (we need that afterwards). Make sure the base-type is set to org.eclipse.core.runtime.xml and don't forget to add some file-extensions to bind that type to specific files.
 
Step 2: Creating the editor

Extend org.eclipse.ui.editors and create a new editor. Your editor needs a unique id and some nice name. Before we are going to implement the editor, we add a contentTypeBinding to it. Select the contentTypeId you entered before when we defined the content type.

Now go back to the editor definition and add a class com.codeandme.xmleditor.ExampleEditor with following source:
package com.example.editor;

import org.eclipse.wst.sse.ui.StructuredTextEditor;

public class ExampleEditor extends StructuredTextEditor {

    public ExampleEditor() {
    }
}

Once done your plugin.xml should have following content:
<?xml version="1.0" encoding="UTF-8"?>
<?eclipse version="3.4"?>
<plugin>
   <extension
         point="org.eclipse.core.contenttype.contentTypes">
      <content-type
            base-type="org.eclipse.core.runtime.xml"
            file-extensions="example"
            id="com.codeandme.xmleditor.content.example"
            name="Example Files"
            priority="normal">
      </content-type>
   </extension>
   <extension
         point="org.eclipse.ui.editors">
      <editor
            class="com.codeandme.xmleditor.ExampleEditor"
            id="com.codeandme.xmleditor.example"
            name="Example editor">
         <contentTypeBinding
               contentTypeId="com.codeandme.xmleditor.content.example">
         </contentTypeBinding>
      </editor>
   </extension>
</plugin>

It's easy as that. Now you have a basic XML source editor associated with your example files.

Step 3: Using the editor

When using the editor in your own RCP make sure you include the Plug-ins org.eclipse.wst.xml.core and org.eclipse.wst.xml.ui to your RCP.